Showing posts with label dinner. Show all posts

Monday, January 5, 2015

Olive Oil Roasted Cabbage.


I thought I was a foodie before I tried roasted cabbage. I was clearly wrong. Prepare to have your culinary minds blown. After all, it's only four, if you could even call it four, ingredients!!


I've been wanting to share this recipe with you guys for a while!! It's just too good to keep to myself. But I can also hear you saying: but Meg it's a simple recipe, so how can such flavor come from such simple ingredients? Cabbage? Come on!

You're right, this is a simple recipe. It's easy to prepare, easy to make, and easy to eat since it pairs well with many different foods. The taste of this dish, however, is anything BUT simple. The olive oil creates a rich flavor that compliments the sweet taste of the roasted green cabbage, and there are soft and sweet bits of cabbage intermingled with darkly browned crunchy delicious pieces.  Heaven!
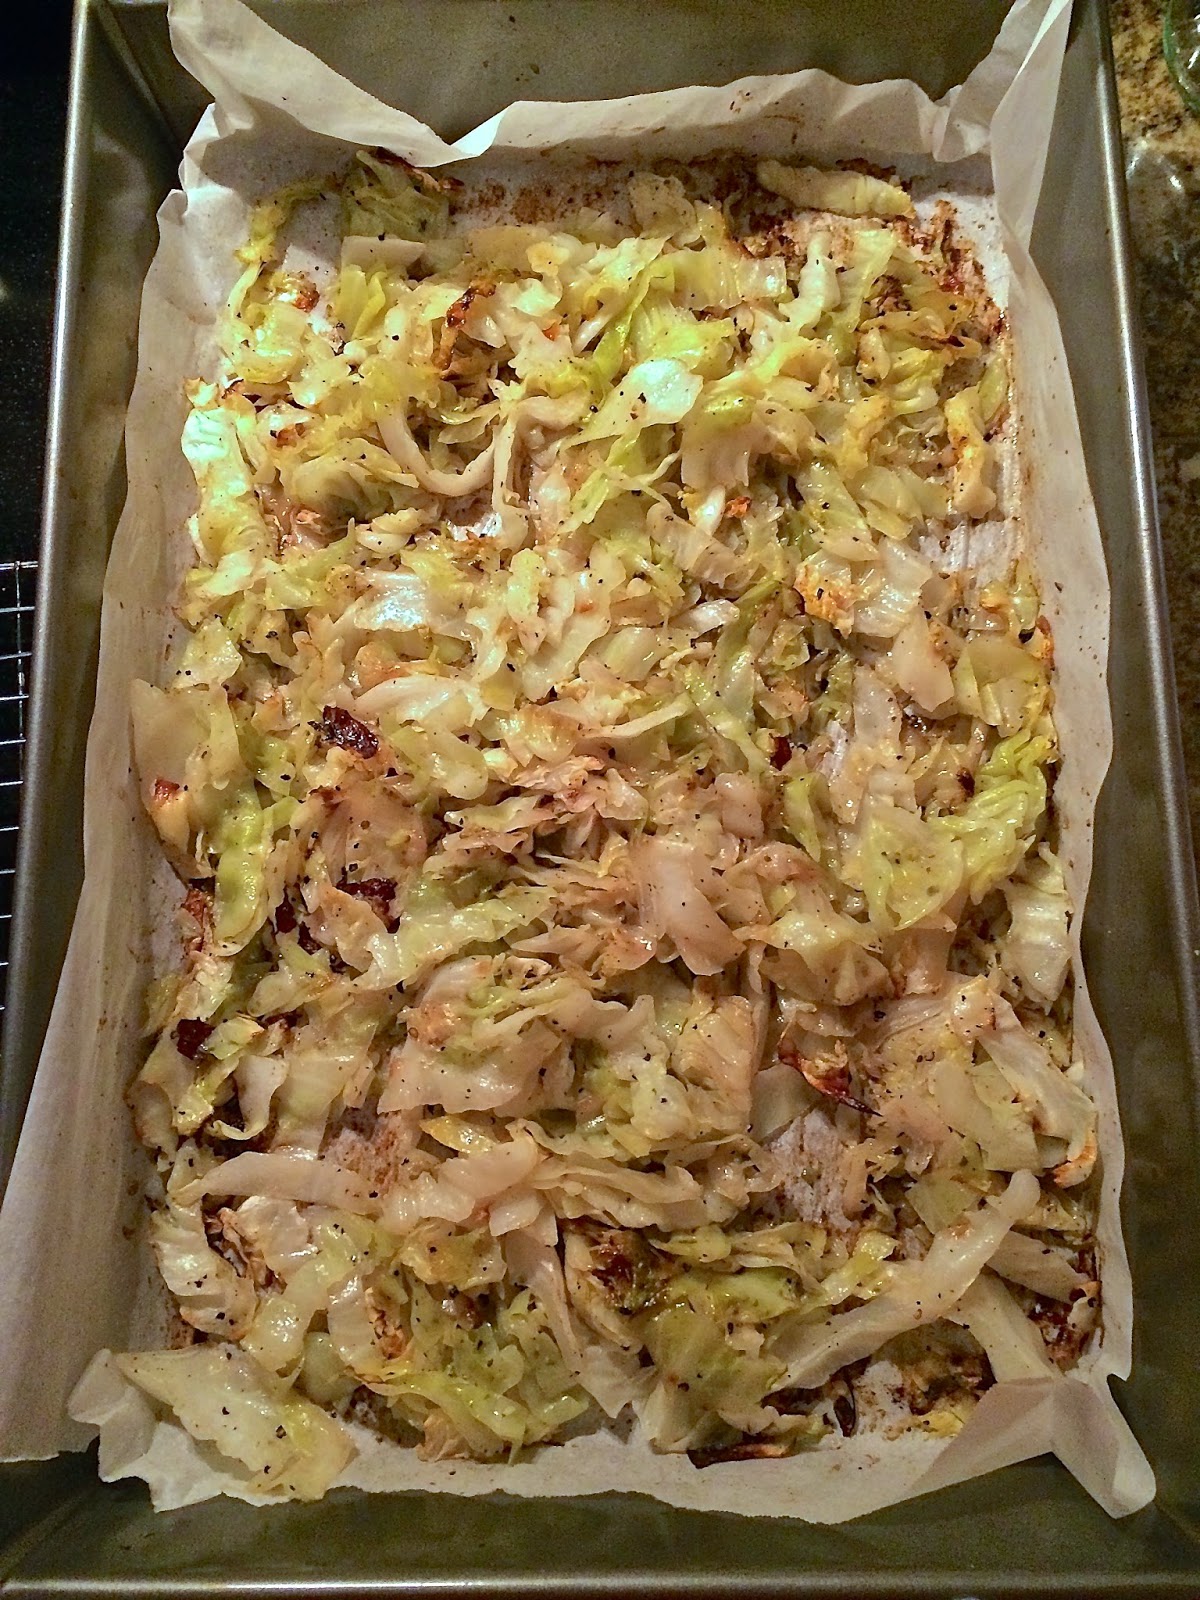

Olive oil Roasted Green Cabbage. 
    makes enough cabbage for meals for one, for one week

    1 head of green cabbage - I don't buy organic here, since cabbage is part of the "clean fifteen"
    good quality olive oil for drizzling - source
    unrefined sea salt - source
    ground black pepper

To roast your cabbage:
  1)  Use a large roasting pan or baking sheet; line with either parchment paper or a Silpat silicone baking sheet.
  2)  Slice cabbage into 1/2" thick slices. The break apart leaves/pieces with your hands. (You can also cut along the inner part and keep the leaves attached in the middle - this makes "wedges" - and you can roast it that way too - I've done it both ways and like both equally)
  3)  Place in pan, drizzle liberally with olive oil (don't saturate, just get mild coverage over all cabbage), sprinkle with salt and pepper (don't be shy!) and TOSS well with your hands.
  4)  Spread cabbage evenly, and bake in a 400 degree (mine's non-convection) oven for anywhere from 20-40 minutes. Leaving in cabbage longer will give you some nicely browned pieces that get crispy and delicious. Baking for less time will give you a cabbage that isn't as fully cooked and is more on the crunchy side. I highly recommed baking it for longer :)
  5)  Remove from oven and enjoy! Keep in the fridge all week for snacks, salad toppings and as a main course side. I really enjoy pairing mine with homemade hummus, carrots and some chicken!


Yes, it's that simple, and yes, it's THAT good. Try it out!

(FYI - I haven't tried this process yet with red cabbage, but I'm sure you could do that too.)

Happy New Year my lovely readers! I go back to school today :)

Monday, November 18, 2013

Thanksgiving Ideas 2013.


Hello, everyone! I just want to say that, yes, I am alive. Medical school does not leave me much time for anything, including the necessities like vacuuming, much less writing a blog post!

With the holidays around the corner (Thanksgiving! Christmas!), I wanted to share some links with you of some yummy things I've been eyeing. This Thanksgiving I'll be spending with my friend S and her hubby and family and friends. She's relatively new to GF and paleo-ish, so it's going to be a fun time in the kitchen making delicious food.


Thanksgiving Ideas 2013 --> just click the links below!

Start your day of food prepping and cooking with this bright and light smoothie, just be sure to add some protein so you don't crash later!

Every Thanksgiving table needs...  Cranberry sauce, roasted veggies of all kinds, cauliflower garlic mashed potatoes, squash fries, some form of sweet potatoes, corn bread, corn bread, (yes two kinds is perfectly acceptable!), brussel sprouts, and green bean casserole, if that's your thing. And what about a broccoli-bacon salad? Or a light and easy spinach salad?

The main event... Want to switch it up this year? How about smoked turkey?

Who loves muffins? My mom's favorite snack and side for nearly any fall/winter holiday is these grain-free pumpkin muffins. If pumpkin muffins aren't your thing, or you want something to more easily please many different taste buds (young and old)... try these crowd-pleasing grain-free cranberry orange muffins, chocolate chips are optional!

This is my favorite pumpkin bread... Pst, it's unsweetened! ;)

Is there anyone who wants egg-nog before Christmas?

Dessert options are many...

My inner New-Englander loves any kind of grain-free apple crisp; this version has a crunchy delicious topping!

And of course there's vanilla ice cream, because apple crisp and paleo pumpkin pie always must be served with ice cream.

Cake, because it just may be someones birthday on or around Thanksgiving.

And for those of you who always need some chocolate, how about some brownies ;)

Lastly... After the main event... make some delicious grain-free waffle sandwiches using all your leftover turkey and cranberry sauce!


I hope you all have a warm and safe Thanksgiving holiday! Enjoy the time with loved ones, and don't forget to crunch some leaves if you have them :)


Sunday, March 3, 2013

Meat + Egg Protein Bites.

I am finding that I have very little time for cooking now that I am in medical school, and I've been searching for easier and easier ways of eating home cooked real food that doesn't take a lot of time, or create a lot of dishes, which I will inevitably have to do myself.


One evening as an experiment (and since I was short on time), I took some grass-fed ground beef which I had defrosted, stuffed it into a mini muffin tin, and baked it. Turns out my experiment worked very well, and I decided to do it on a larger scale.  This time I used a normal sized muffin tin and cracked an egg on top - a definite success!

This is the what the underside looks like :)

This recipe is so easy because all you have to do is take your meat of choice, section it into a muffin tin, press down and bake! In less than a half hour you have easy bites of protein which can be conveniently topped on a salad, warmed with a side of veggies, or eaten quick and on the go. I seasoned mine with only a little bit of salt, but feel free to sprinkle on top whatever spice you fancy. Cheese and ketchup were my other experiments, which turned out great too! Please note - do not grease the muffin tins, there is enough fat in the meat and there will be no sticking. The meat actually shrinks away from the sides and will look like it's "swimming" in fat when you take them out of the oven. I really like this because you can so easily lift out each little bite / piece and place on a paper towel, and then discard (or save) the meat fat / tallow that has rendered out of the meat!


Meat + Egg Protein Bites.
    makes 1 dozen

    1 lb  grass-fed ground meat - I used pet burger 
    12  pastured happy eggs
    sprinkle unrefined sea salt
    spices - optional
    ketchup - optional
    cheese - optional

To make your protein bites:
  1.  Evenly section out beef between the holes of a normal sized muffin pan.
  2.  Press down with your fingers. Add optional spices or cheese.
  3.  Crack an egg on top. Sprinkle each with unrefined sea salt
  4.  Bake in a preheated oven at 350 degrees (don't believe mine is convection), for 25-30 minutes. Bites will be ready when eggs are cooked through. Remove from oven and promptly grab bites out of the tin with tongs, placing then on a paper towel drain. When cool, store in a glass container in the fridge for grabbing whenever you need some protein :) ENJOY!


Even though this idea is quite simple, they taste so good. It would be possible to make this with ground chicken, turkey or bison, but I would suggest greasing the sides of each muffin cup with olive oil first; these meats have very low fat content and therefore may stick.

 I hope you find these a useful addition to your food plans for busy weeks :)

Monday, September 24, 2012

Cauliflower Garlic Mashed Faux-tatoes.


Like most people, I love mashed potatoes.  I think they are the best when the skins are left on, they are creamy but hold their shape, and they have a nice garlic flavor.  Every since going gluten-free, becoming healthy, and really changing my diet, mashed potatoes have gone out the window.  While they were a treat before, they are now a complete rarity.  Until now.

Since I found out about the Weston A. Price foundation and Primal eating, I have rediscovered mashed potatoes. Only now they aren't actually made of potatoes, they're made out of cauliflower!  I used to think cauliflower was ghastly, and I would say that it was just a bad tasting version of broccoli (I love broccoli).  Well I am a firm believer that vegetables must be tried in several preparations, and more than one time, before anyone can say they don't like them.  Because now, I love cauliflower.  And after trying several fruits and vegetables several times, I now like them.  Once I didn't like cucumbers!

Now that cauliflower has made it's way into my diet, I've decided to make them in mashed potatoes.  This idea has been floating around in the Primal community for a while, and while I have made "cauliflower mash" before.  This time was different.  I went all out.  Roasted garlic.  Butter.  Whole milk.  Food processor.  Super smooth texture.  Oh yeah! 


Cauliflower Garlic Mashed "Faux-tatoes."
   makes about 8 servings

    1 head of cauliflower, steamed or boiled
    1/4-1/2 cup  raw whole milk
    4T - 6T  real grass-fed butter
    8 cloves of home-roasted garlic
    1/2 tsp  unrefined sea salt
    1/2 tsp  black pepper

To make your mashed potatoes:
  1.  Place hot boiled or steamed cauliflower, in a food processor.  Add butter and roasted garlic cloves.  Blend until smooth. Add spices. Blend.  Lastly, add milk until desired consistency is reached.
  2.  Taste.  Modify if needed. (Becareful, these are really good, it was hard to stop eating them! ;)
  3.  Serve warm with some more butter (if desired) along with a nicely cooked protein, like grass-fed beef, chicken or turkey!


Leftovers (if there are any) keep really well in the fridge.  Eat within a week.  They are even great cold!  This recipe is a great side dish option for those of us who do best on low carb, low starch, Primal, paleo diets.

Monday, September 17, 2012

Cranberry Sauce with Oranges.


My mom loves cranberries!  This past Christmas I decided to make some real cranberry sauce to accompany some turkey we were having.   The recipe was an experiment but a complete success.   I knew I wanted to blog about it, but had to wait until the summer to make it again, tweek the ratios/flavors, and give it a photo shoot.  I am happy to say that the recipe was again successful!  So here it is... cranberry sauce in September.  The meal photos are from one July evening this summer, when I decided to make a miniature "Thanksgiving" meal in July.  It was delicious!  With some cornbread taken from the freezer, some roasted turkey breasts and frozen cranberries we froze during cranberry season, a miniature Thanksgiving in July was served. 

I plan to make this cranberry sauce again, and again for all the remaining Thanksgivings and Christmases to come.  It's a fantastic alternative to the canned refined-sugar gelatinous mass that usually is called cranberry sauce.  This recipe is gluten-free, primal, paleo, yada-yada, and very easy!  The honey balances out the tartness of the cranberries, and gives a hint of sweetness.  Cloves and chinese five spice make it just a little bit spicy ;)


Cranberry Sauce with Oranges. 
    makes 10-12 servings

    8 oz  bag fresh organic cranberries
    3  oranges, peeled, ends cut off and sectioned
    1 T  organic coconut oil
    1/4-1/2 cup  raw honey
    zest of 1-2 oranges
    1/4 tsp  chinese five spice
    1/2 tsp  (or more) ground cloves
    pinch  unrefined sea salt
    water as needed

To make your cranberry sauce:
  1.   In a 10" inch skillet or sautee pan, simmer cranberries with coconut oil.
  2.  While cranberries are simmering, zest oranges.  Juice oranges into the skillet.  Simmer until cranberries soften and break apart ~10 minutes on medium and high heat.  Stir every few minutes.  Add some water if needed.  Do not let it burn.  Add zest to skillet.
  3.  Add honey, spices, and salt.  Stir well.  Simmer for another 10 minutes.  If sauce is too thick, add some water to thin it out.
  4.  Serve with turkey and some delicious cornbread.  May be served cold or hot.  Keep leftovers in the fridge.  It can also be frozen.


When cranberries come back into season this winter, give this recipe a try!  Your family will love it's sweet and spicy flavors as an alternative to the "classic" canned cranberry sauce.

Tuesday, June 12, 2012

Squash Fries.


See those yellow things?   No they are not french fries... They're SQUASH fries!  Also known as my version of "real food french fries."  Squash fries have no trans fats, acrylamides, or toxic omega-6 vegetable oils.  They are super easy to make and are a definite crowd pleaser.   They are Paleo and Primal.  Your friends, family, spouses and children will have NO IDEA that they are eating something healthy and nourishing.  You'll never go back to eating normal french fries again.  Well maybe not true, but you'll definitely consider the thought -- they're that good!  My family could not rave about them more.

The other foods in the picture are homemade venison burgers with fresh chopped onion, parmesan cheese and spices.  And the white stuff is not rice, but cauliflower rice, which is simply steamed soft cauliflower mashed with a fork and mixed with grass-fed butter, and salt and pepper.  Deliciously Primal and Paleo!  I can't believe ketchup didn't make it into this picture :)  We love ketchup at my house and that would be a perfect addition to this meal.   I am sure I doused my plate in it after snapping this photo ;)  Dipping these nourishing squash fries into real ketchup made this meal a highlight of my culinary year.   I am so excited to (finally) be sharing it with you... I've been making these for almost a year.

Squash Fries
    makes four servings

    2  organic delicata squash
    unrefined sea salt
    organic black pepper

To make your squash fries:
  1.  Prep the squashes:
             1)  Wash the outside of the squash well.  You will be consuming the skin.
             2)  Cut both ends off of the squash and then cut in half lengthwise.
             3)  Scoop out the seeds from both halves.  Slice lengthwise into small strips
  2.  On a hot cookie sheet that has already been in the oven (can be lined with a Silpat), broil the squash fries on high, watching carefully so that they don't burn and moving them so they don't stick to the sheet.  Having the sheet already hot helps them to come out more crispy.  You can also bake these around 425 until they are cooked, as well.
  3.  Serve to your wonderful family with condiments of choice.  I like sprinkling some more unrefined sea salt on mine and then dipping them in ketchup.  If you do have leftovers, they keep very well in the fridge for a couple of days.  Eat them cold :) or warm them up!

YUM!  So easy and so delicious!  They make a great primal snack!

Sunday, October 9, 2011

Grain-free Pumpkin Lasagne And An Update

It's been a while since I posted. I am back at school and am busy.

Here's a lightening fast update:

1. I live in an apartment now, not a dorm and that means I CAN COOK my own meals!

2. This vegetable lasagne was one of my latest. It features layers of spinach, cabbage, onion, pumpkin, ricotta cheese, mozarella cheese, organic ground beef and fresh italian herbs.

"Lasagne" - Primal/grain-free, gluten-free, soy-free, full of cheese and veggies and meat, complete with one side "ketchuped"
Here's a mini view of the kitchen - notice the saurkraut fermenting in the background!


3. The recipe is coming!

I miss blogging, but don't worry I am still here!
More frequent posts are hopefully in the near future :) Currently I am swimming in microbiology, genetics and several other fun classes.

❤ ♡ ❤ ♡ ❤ ♡

Saturday, June 25, 2011

Grain-free Dinner Snapshots

Lamb-bone cabbage fennel soup with grass-fed
beef liver pate on lettuce with pickles

Sweet potato and carrot "fries," broiled bacon, vadalia onion
over fresh baby spinach, fried egg and broccoli sprouts.
Served with ketchup :) 

Baked chicken w/ bone and skin, sauteed broccoli and onions,
grain-free cauliflower, pumpkin and butternut squash "rice"

Grass-fed beef and bison burgers on the grill, with grilled
veggies, served with bib lettuce "bun" and grass-fed raw cheddar

Sometimes I am really good about taking photos of the dinner I make, but often times I'll be half way done with the meal and realize "oops I forgot to take a picture!" Here are some photos of plates that I haven't missed :) Don't forget the ketchup!

Sunday, May 29, 2011

Woah!

Is all I can say! I've been gone virtually all semester. The last time you heard from me was when I shared my delicious Sunbutter Chocolate Protein Bars. I've been home two days and can't wait to make them again soon, but first let me back up and share a little bit about just where has Meagan of MNuffins been?

Well, I'll tell you, I've been...

Studying the digestive system,


Suffering through Physics 2,


Enjoying the California Spring-time flowers,


Spending some time at Disneyland,


Taking pictures of things NOT related to food,


Finding REAL POT ROAST at Whole Foods,


Eating a couple or a couple hundred salads,


Cooking and experimenting with new meals during Spring Break,


Eating at the first fine dining restaurant of my life,


Snapping pictures of a San Diego coastline,


Having many delicious breakfasts,


Picking up the best magnet ever, thanks to a friend,


Isolating my own DNA,


and much much more!

Overall, it was a very hard semester. But through all that hardship it was clearly a semester of growth. I very happy to say that I am finished and am back in the North East for the summer. It's good to be back. It's been a lot to process emotionally. Finals week, storage and ending up in the airport all happened way too fast. I have experienced so much change already.

I sincerely look forward to sharing more recipes that I've been dreaming up all semester. Thanks for visiting and always checking back even though my posts are not as frequent as they could be. My studies come first. And of course, welcome to all new readers!

Let SUMMER begin :)

Saturday, January 15, 2011

Grain-free Spaghetti Squash Casserole


Coming back to NH and the frigid winter temperatures for Winter Break is fun to a point, but it's also freezing! I find myself turning away from salads to warmer dishes. Incorporating protein, vegetables and fats is top priority in each dish, to ensure that it is nourishing and satisfying. Having something warm and easy to make to come home to is wonderful. Driving in the car home after a day at work is freezing! Whipping this up for dinner and sipping some green tea or raw hot cacaolate does the trick for me. I know that this dish will warm your insides too :)


This recipe was inspired by this recipe and this recipe. My version is probably more like the first than the second. It was delicious - thank you ladies for the great idea! This is one of the first dishes in a long time that I couldn't wait to eat the leftovers. The next day I warmed up a piece gently in the toaster oven in a glass baking dish and dinner is served, as delicious and flavorful as the first time!

Melted and gooey mozzarella

Spaghetti Squash Casserole
    serves 6, no leftovers, serves 3 with nice amount of leftovers :) Tastes just like lasagna!!

1 large spaghetti squash
2 Tbsp olive oil
1 tsp dry italian herbs

1 cup whole milk ricotta cheese
2 egg whites
garlic powder - as needed

3 cups leftover spaghetti meat sauce (spaghetti sauce with ground beef)
1/2 one small zucchini, diced
1/4 one large vadalia onion, diced
1/2 cup frozen chopped green beans
2 Tbsp fresh chopped green scallions

1 1/3 cup fresh grated raw parmesan cheese
1 fresh whole milk mozzarella ball, sliced thinly into circles

To make your casserole:
1. To cook spaghetti squash, chop open with a knife into two halves the long way. Place on a sheet pan with a Silpat with the cut side down, or spray with olive oil and place in a glass baking dish. Bake at 350 degrees for about 30 minutes, or until it is easy to pierce through the squash skin.
2. Remove the squash from the oven and while holding in an oven mitt, shred out the squash with a fork. Place it into a olive oil sprayed glass casserole dish and push down, going up a little on the sides like you would a pie.
3. While the squash is cooking, on the stove-top sautee zucchini, both onions, and green beans in half of the herbed olive oil until tender. Add the spaghetti sauce (with meat) and bring to a simmer. Sprinkle garlic powder on top and stir.
4. Mix the ricotta with the other half of the herbed olive oil and egg whites. Spread on top of the bottom layer of spaghetti squash, avoiding the taller sides of the dish. Sprinkle garlic powder on top and add parmesan cheese on top of this.
5. Gently spoon spaghetti-veggie sauce on top of the ricotta layer. Spread evenly. Sprinkle lightly with more parmesan. Place sliced mozzarella on top, sprinkle with salt and pepper, and then finish with the remaining parmesan cheese.
6. Bake in the oven until bubbly and slightly browned on top about half an hour. Remove from oven and let cool/set on counter before serving. Yum!


I had so much fun eating and making this dish. This is going in the "make more often - I love love love this dish - put into normal rotation" recipe pile. My parents agreed. Give it a try and I know you will too!

Enjoy :D and stay warm. I believe my thermometer says 1 degrees Farenheit outside.... Eek!

Friday, January 7, 2011

Carrot Rutabega soup


I really enjoy making soups, especially in the winter time. Soups can be easily packed with veggies, protein and nourishing fats, which is in my opinion, the perfect combination. To make this soup you will need an immersion blender, which if you have not invested in, I highly encourage you to do so. They are so easy to operate and are perfect for soups because they break up all the ingredients really fine and transferring to a blender or food processor is not an issue or too hot (don’t burn yourself!) My words of advice on your purchase – buy a blender with metal or guaranteed not to melt plastic. I have ruined an immersion blender before since the “foot” encasing the blade was made of plastic which came in contact with the bottom of my hot crockpot. Do not worry about spending a huge amount of money on one either. Purchase one made by a reputable brand and enjoy.

Topped with crispy baked onions and Paive cheese

This soup involves loads of roasted vegetables. The end result features a wonderful bright orange color! Also, this recipe does not make too much soup. Sometimes I feel like I am floating in soup after making a recipe, there will be too much leftovers to freeze. When I am look at a soup recipe I am always thinking – what if I do not care for the flavor once I make it? That is one positive to making a smaller pot of soup. With no leftovers, this will easily feed a hungry family of six, or a very very hungry family of four. In my house it is now only me and my parents, so we had about 1.75 quarts of soup left over; and our portions were not large.

Carrot Rutabega soup

1 rutabega, scrubbed, peeled, diced (mine had ~6” diameter)
1/4 vadalia onion, diced in strips

1 large clove garlic, peeled, cut into large chunks
1 small yellow onion, large dice
1 bag normal sized carrots, cut large ones in half – use less if yours are gigantic

2 Tbsp olive oil
1 Tbsp minced garlic (mine was from a jar)
3 good dashes red pepper flakes
1 15 oz can organic pumpkin – can use fresh if you have it!
4 cups chicken stock

Finishers:
1/2 stick real grass-fed butter
~1/4 tsp each: allspice, nutmeg, cardamom
~1/8-1/4 tsp cloves
1-2 tsp cinnamon
1-2 tsp oregano
1-1.5 tsp sea salt
~1/2 tsp black pepper

To make the soup:
1. In a large pot (this soup did not fill my 8 quart at all), heat olive oil on low-medium heat and add minced garlic and red pepper flakes. Let it get to know each other, turn it down if the oil smokes or spices begin to burn.
2. With ingredient group #1, spray lightly with olive oil and toss in salt and pepper. Spread out on a cookie sheet and place in a 400 degree oven until rutabega is tender.
3. With ingredient group #2, spray lightly with olive oil and toss in salt and pepper. Spread out on a cookie sheet and place in a 400 degree oven until carrots are soft.
4. While the veggies roast, get out your immersion blender. Add the pumpkin and chicken stock to the pot and whisk together. Bring the soup up to medium heat, where it should bubble and simmer.
5. When the veggies are cooked, add carrots and onions to the pot. Puree right in the pot with the immersion blender. Add the rutabega. Stir.
6. Lastly, add spices, butter and water as needed (depending on how thick or thin a soup you desire). My soup was thick, full of pumpkin and orange goodness with bite sized chunks of rutabega.

The spices for this are not spot on. I think the soup needed another hour to simmer with the final components added in, so the flavor could absorb and disperse throughout. I had some of this soup with greek yogurt for breakfast this morning and I really enjoyed the flavor profile. It tasted fantastic. So my advice would be to make ahead and refridgerate, or make the soup in the morning and serve it for dinner that night. Also, be sure to add some protein to your meal. We did that by cutting up some turkey hot dogs and grating some Paive cheese on top. I also made some "eggs in a nest" - idea from Cara - served on the side for protein.

The soup on top of greek yogurt and banana peices!

Love orange soups? You should check out my Red Vegetable soup, and also my Orange Vegetable soup, for lack of better names! These soups are great because they are packed full of vitamins and they fill you up without being heavy or huge in calories. It’s perfect end for a long day at work, or coming from a walk in the winter cold. And as I learned this morning, it makes a great cold breakfast!

I will give you all a Christmas update hopefully soon. Also, I apologize that I never got recipe ideas for Christmas posted. Things got a little hectic on my end. Please don't forget about my giveaway - it's so exciting! I also have a surprise post for you, so stay tuned :)

Happy Frigid January temperatures (at least here in New England)!

Sunday, November 21, 2010

Thanksgiving Recipes

The BEST Cornbread
If it's your first gluten free Thanksgiving, you are probably struggling with knowing what you can eat, how to prepare it, and what is even going to taste good. Throwing other allergies into the mix, like soy and dairy, makes finding nourishing real food options even harder. Fortunately, with the right ideas, recipes and ingredients, Thanksgiving can be just as much as enjoyable as before.

Last Thanksgiving, the snack spread
where I spent Thanksgiving.

It doesn't matter if you follow a gluten free diet or just eat real food, these recipes are delicious and will certainly make your kitchen the most favorite spot of the house. Some of these are classics, and some are a spin on the original. Don't be overwhelmed this Thanksgiving. I encourage you to pick up a recipe and bake some good, wholesome, real food, with no odd ingredients. Real butter, cheese, meat, eggs, fruits, veggies. Enjoy food the way it was meant to be eaten, with family, friends and made with love from nourishing ingredients.

Photo credit: Tasteto.com
Gobble, Goooble.

All of these recipes would make great additions to your Thanksgiving meal.

Gluten free Cinnamon Scones


Thanksgiving breakfast:
Cinnamon Scones
Grain free Pumpkin pancakes
Goat cheese and zucchini frittata

Guacamole


Pre-meal snacks:
Apples and Caramel Dip
Pumpkin and Feta Muffins
Nourishing Protein bars
Organic Basil Grain free crackers
Veggies to dip in - Basic Guacamole

Beverages:
Hot Apple Cider
good ole H2O

Photo Credit: Annie's Eats
Turkey Turkey Turkey...


Main event: Turkey

Photo credit: Simply Recipes
Brussel sprouts


Sides:
Almost Grain-free Crusty Gluten free bread
Brussel Sprouts with Bacon and Chestnuts
Butternut Squash Gratin
Garlic mashed potatoes
Gluten free, grain free coconut flour bread - use this to make stuffing
The Best Cornbread - my most favorite recipe
Tossed green salad with Basic dressing
Root vegetables
Oven Roasted Sweet Potatoes
Sweet Potatoes with parsnips and pecans
Sweet Potatoes with macademia nuts


French Vanilla Ice cream


Dessert:
Homemade French Vanilla Ice Cream
Pumpkin Cake Bars with Cinnamon Icing
Spiced Coconut Macaroons
Apple Crisp


What are you thankful for?
Happy Thanksgiving Everyone!


Colossians 3:15
Let the peace of Christ rule in your hearts, since as members of one body you were called to peace. And be thankful. Let the message of Christ dwell among you richly as you teach and admonish one another with all wisdom through psalms, hymns, and songs from the Spirit, singing to God with gratitude in your hearts.