You guys, this stuff is RAD. It's rad both because it tastes good and because it's good FOR you!
In medical school, we received extensive education on herbal medicine. One of the great Naturopathic doctors who helped integrate the use of botanicals and primary care naturopathic medicine was Dr. Bill Mitchell. His case books tell great stories of people acheiving wellness through natural therapies. I've seen this first hand in my own practice, also, which is why I became a Naturopathic doctor in the first place!
This berry juice was one of Dr. Mitchell's passions. His family still carries on his legacy, and sells a great product. I've used that product personally and with patients, and it's delicious, but I knew I could make something easily at home and reap similar benefits.
Berries, mostly the blue and dark dark colored berries, contain anthyocyanodins. Anthocyanodins are potent antioxidants, and they have a great affinity for the vascular system. Men, young and old, should be on this berry concentrate daily. Women benefit the most after menopause, as their cardiovascular health risk increases.
Here's the recipe: get cooking! Be sure to read the whole recipe first before embarking.
Dr. Meg's Blueberry Juice.
makes 1 quart jar + berry "compote" leftovers
8 pints organic blueberries
8 pints organic blackberries
^ I previously lived in Seattle, and had access to local farms, this equates to 2 flats of berries
1 cup filtered water
1 Tbsp coconut oil
Directions:
1) Turn your slow cooker on to WARM setting, you want things to heat up for extraction of constituents, but not to "cook" the berries.
2) Add all your berries to the pot, add water, and coconut oil. Replace lid.
3) Simmer on warm for 48 hours, stirring occassionally, only about 3 times per day.
4) When done, berries should look "shriveled" like you defrosted frozen blueberries, and the juice should nearly cover the berries and be dark blue in color.
5) With a fine mesh strainer, gently scoop the berries out, and press-out juice lightly with the back of wooden spoot into a funnel that goes into a large 1 qt mason jar. Do this in batches. You will be left with about 1 qt of berry juice and berries.
6) Store in the fridge. I like to eat the berry portion with breakfast (see my recipe for chia pudding) and then take shots of the juice OR add to a large portion of water and drink throughout the day.
7) The berry juice is not very sweet, so it won't affect your blood sugar levels much.
Enjoy :)
Showing posts with label low carb. Show all posts
Friday, January 19, 2018
Friday, December 25, 2015
The Most Awesome Massaged Kale Salad.
A few months after getting on the "I love kale" band-wagon, I discovered just how great massaged kale salads taste. Also, they are incredibly easy to make. The massaging process only takes a few minutes, but is sufficient to break down the cellulose and other fibers in the kale, making the leaves more digestible and less chewy when eating. This version is super simple, and very customizable. I like to add parmesan cheese for a salty kick and an off-set to the slight bitterness of the kale leaf. But if dairy isn't your thing, feel free to leave it out.
The Most Awesome Massaged Kale Salad.
serves 4-6 depending on your kale-love-level
2 heads dino kale, stems removed, and cut into 1/4”-1/2” ribbons
1/2 cup freshly grated parmesan cheese
2 Tbsp tahini
juice of one lemon
1 Tbsp olive oil / drizzle of olive oil
3 dashes nutmeg
2 dashes cayenne pepper
1 dash smoked hot paprika
1/2 tsp red pepper flakes
salt and pepper to taste
Directions:
1) Place kale in large bowl, add lemon juice, salt, pepper, and olive oil. Massage with bare hands for 3-5 minutes, until kale decreases in size by half and is soft and looks dark green.
2) Add parmesan, tahini, and spices. Mix thoroughly.
3) EAT and enjoy! This is even better the second or third day, but I doubt it will last you that long!
Feel free to add more heads of kale if you want to make a bigger portion, but you may have to adjust the amount of cheese and tahini; however, I've made this with 3 heads of kale and didn't add any more ingredients. It's that forgiving! The photos here are of the salad made with regular green kale, but I much prefer the dino kale, but both work and are equally delicious.
Possibly vegan, gluten-free, nutrient rich and delicious. Share it with all your family and friends. They’ll gobble it up! My family, friends and I surely did.
Xoxo,
Tuesday, May 19, 2015
Benefits of Coconut Flour.
Many of you readers (hello! long time no see!) know how much I loooove coconut flour. Coconut flour has been such a great option for me, for many reasons, and I know many of you have learned the ins and outs of baking with coconut flour too and love it just as much as I do.
For those of you who are still on the fence, or just haven't hopped on the coconut train (it's a serious train that's been chugging very strong for several years now) then I'm here to convince you to give coconut flour a try.
My journey with coconut products began several years ago when I first learned about the paleo way of eating. Focusing on the paleo / primal template for my food choices was a great option for me, and during this time I discovered the awesomeness of coconut flour.
What makes coconut flour so awesome is mostly its nutrition stats, its affordability and its versatility. Today I'm here to tell you about why coconut flour is a healthy choice, so that will be my main focus, but I'll also touch on the other two points near the end.
Disclaimer - While I do have extensive training in nutrition, I am not a doctor, nutritionist or registered dietitian, so implement this information with your own discretion.
Why I Love Coconut Flour 101
1) Contain healthy fats
- Healthy fats are so important for our bodies. We need fat in order to make healthy skin, hair, and nails. Fat is an essential part of our brains, as well as ALL our cell membranes which are basically a double stack of fat molecules, called a phospholipid bilayer. Many sources of fat also contain cholesterol, which is an essential building block of almost all hormones. Pregnant women need a higher intake of essential fatty acids (EFAs) in order to make the babies brain (most importantly).
- Coconut flour contains medium chain triglycerides (MCTs) aka medium chain fatty acids (MCFAs). You've probably heard about these before. What's great about MCTs is that they are metabolized very quickly by the body and so are used as an energy source right away, in contrast to LCFAs (long chain fatty acids) which need a more involved process in order to be broken down and utilized. MCTs are also very antimicrobial.
- Coconut flour is also rich in a type of fat called lauric acid, which along with MCTs, are very antimicrobial. Both together can help contribute to a healthy balance of body flora, on our skin and in our gut.
- In less than one ounce of coconut flour, it contains about 3 grams of saturated fat.
- It is also worth mentioning that coconut flour is low carb, which makes it a great alternative for those who medically need to choose a low carb diet, and for others who eat low carb diets by choice.
- Fats also contribute to feeling satisfied with the food you're eating, so you are more likely to stop eating and be satisfied with how much you've eaten, when you are feeling full.
2) Fiber content
- Many baking flours on the market are devoid of certain nutrients, and other properties like fiber, but coconut flour is NOT one of them! Coconut flour is rich in fiber, and if you've ever worked with coconut flour before you know that if not used properly, it will suck up all the liquid in your recipes and the end product will be very dry! That's because of all the fiber.
- In less than 1 ounce of coconut flour, there is 11 grams of fiber.
- Fiber is necessary in our diets because it is needed to detoxify hormones, to help move our bowels, and to feed the bacteria in our colons.
3) Protein
- Most flour products contain little or NO protein, but coconut flour actually does!
- In less than 1 ounce of coconut flour, there is 4.5 grams of protein.
- Both the fat, fiber, and protein contents of coconut flour make it very nourishing and satisfying at the same time. Making brownies or cookies or waffles with coconut flour will keep you full for hours, instead of lifting your blood sugar and crashing you down 2 hours later. Say good-bye to the blood sugar roller coaster. ;)
Many of my recipes use coconut flour - but these are some of my absolute favorites. They're also all grain-free! All the photos in this post feature recipes I've created using coconut flour.
I hope you all found this post to be useful, informative, and inspiring! Get baking ;)
Love to you all,
xoxo
I am wrote this post for Nuts.com because they are passionate about sharing information about healthy food! It was good opportunity to join forces in order to spread information about making healthy choices.
For those of you who are still on the fence, or just haven't hopped on the coconut train (it's a serious train that's been chugging very strong for several years now) then I'm here to convince you to give coconut flour a try.
My journey with coconut products began several years ago when I first learned about the paleo way of eating. Focusing on the paleo / primal template for my food choices was a great option for me, and during this time I discovered the awesomeness of coconut flour.
What makes coconut flour so awesome is mostly its nutrition stats, its affordability and its versatility. Today I'm here to tell you about why coconut flour is a healthy choice, so that will be my main focus, but I'll also touch on the other two points near the end.
Disclaimer - While I do have extensive training in nutrition, I am not a doctor, nutritionist or registered dietitian, so implement this information with your own discretion.
Why I Love Coconut Flour 101
1) Contain healthy fats
- Healthy fats are so important for our bodies. We need fat in order to make healthy skin, hair, and nails. Fat is an essential part of our brains, as well as ALL our cell membranes which are basically a double stack of fat molecules, called a phospholipid bilayer. Many sources of fat also contain cholesterol, which is an essential building block of almost all hormones. Pregnant women need a higher intake of essential fatty acids (EFAs) in order to make the babies brain (most importantly).
- Coconut flour contains medium chain triglycerides (MCTs) aka medium chain fatty acids (MCFAs). You've probably heard about these before. What's great about MCTs is that they are metabolized very quickly by the body and so are used as an energy source right away, in contrast to LCFAs (long chain fatty acids) which need a more involved process in order to be broken down and utilized. MCTs are also very antimicrobial.
- Coconut flour is also rich in a type of fat called lauric acid, which along with MCTs, are very antimicrobial. Both together can help contribute to a healthy balance of body flora, on our skin and in our gut.
- In less than one ounce of coconut flour, it contains about 3 grams of saturated fat.
- It is also worth mentioning that coconut flour is low carb, which makes it a great alternative for those who medically need to choose a low carb diet, and for others who eat low carb diets by choice.
- Fats also contribute to feeling satisfied with the food you're eating, so you are more likely to stop eating and be satisfied with how much you've eaten, when you are feeling full.
2) Fiber content
- Many baking flours on the market are devoid of certain nutrients, and other properties like fiber, but coconut flour is NOT one of them! Coconut flour is rich in fiber, and if you've ever worked with coconut flour before you know that if not used properly, it will suck up all the liquid in your recipes and the end product will be very dry! That's because of all the fiber.
- In less than 1 ounce of coconut flour, there is 11 grams of fiber.
- Fiber is necessary in our diets because it is needed to detoxify hormones, to help move our bowels, and to feed the bacteria in our colons.
3) Protein
- Most flour products contain little or NO protein, but coconut flour actually does!
- In less than 1 ounce of coconut flour, there is 4.5 grams of protein.
- Both the fat, fiber, and protein contents of coconut flour make it very nourishing and satisfying at the same time. Making brownies or cookies or waffles with coconut flour will keep you full for hours, instead of lifting your blood sugar and crashing you down 2 hours later. Say good-bye to the blood sugar roller coaster. ;)
Many of my recipes use coconut flour - but these are some of my absolute favorites. They're also all grain-free! All the photos in this post feature recipes I've created using coconut flour.
I hope you all found this post to be useful, informative, and inspiring! Get baking ;)
Love to you all,
xoxo
I am wrote this post for Nuts.com because they are passionate about sharing information about healthy food! It was good opportunity to join forces in order to spread information about making healthy choices.
Monday, January 5, 2015
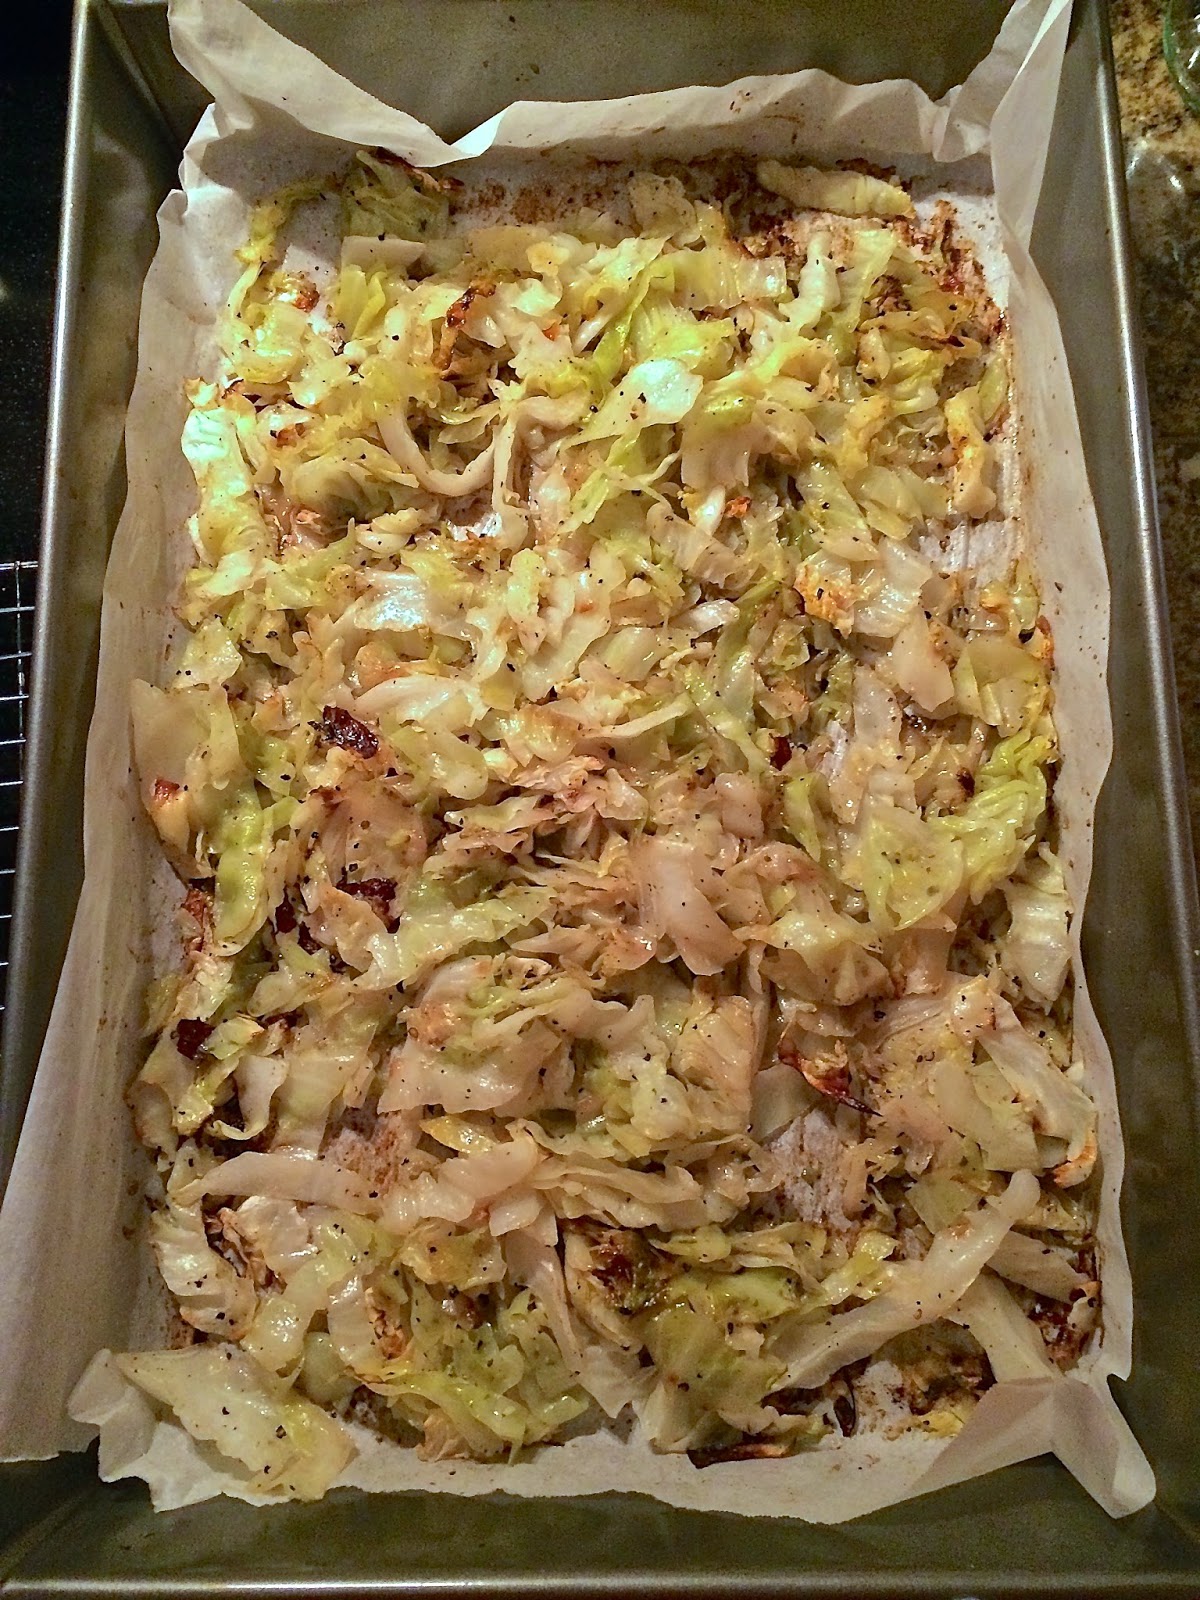
Olive Oil Roasted Cabbage.
I thought I was a foodie before I tried roasted cabbage. I was clearly wrong. Prepare to have your culinary minds blown. After all, it's only four, if you could even call it four, ingredients!!
I've been wanting to share this recipe with you guys for a while!! It's just too good to keep to myself. But I can also hear you saying: but Meg it's a simple recipe, so how can such flavor come from such simple ingredients? Cabbage? Come on!
You're right, this is a simple recipe. It's easy to prepare, easy to make, and easy to eat since it pairs well with many different foods. The taste of this dish, however, is anything BUT simple. The olive oil creates a rich flavor that compliments the sweet taste of the roasted green cabbage, and there are soft and sweet bits of cabbage intermingled with darkly browned crunchy delicious pieces. Heaven!
Olive oil Roasted Green Cabbage.
makes enough cabbage for meals for one, for one week
1 head of green cabbage - I don't buy organic here, since cabbage is part of the "clean fifteen"
good quality olive oil for drizzling - source
unrefined sea salt - source
ground black pepper
To roast your cabbage:
1) Use a large roasting pan or baking sheet; line with either parchment paper or a Silpat silicone baking sheet.
2) Slice cabbage into 1/2" thick slices. The break apart leaves/pieces with your hands. (You can also cut along the inner part and keep the leaves attached in the middle - this makes "wedges" - and you can roast it that way too - I've done it both ways and like both equally)
3) Place in pan, drizzle liberally with olive oil (don't saturate, just get mild coverage over all cabbage), sprinkle with salt and pepper (don't be shy!) and TOSS well with your hands.
4) Spread cabbage evenly, and bake in a 400 degree (mine's non-convection) oven for anywhere from 20-40 minutes. Leaving in cabbage longer will give you some nicely browned pieces that get crispy and delicious. Baking for less time will give you a cabbage that isn't as fully cooked and is more on the crunchy side. I highly recommed baking it for longer :)
5) Remove from oven and enjoy! Keep in the fridge all week for snacks, salad toppings and as a main course side. I really enjoy pairing mine with homemade hummus, carrots and some chicken!
Yes, it's that simple, and yes, it's THAT good. Try it out!
(FYI - I haven't tried this process yet with red cabbage, but I'm sure you could do that too.)
Happy New Year my lovely readers! I go back to school today :)
Monday, December 22, 2014
Single Serving Protein Pancake.
| FLUFFY |
Hey everyone :) I know it's been a while, but this blog is no longer a tip top priority! Med school has me busy busy, along with all the typical life stuff that has to happen. Talk about a balancing act!
Today I bring you a recipe for a single serving pancake. I've been eyeing pancake recipes lately, especially the "single lady" ones, but I was never quite happy with the ingredients that were used, so I chose my own.
![]() |
| Banana slices hiding on the bottom, with greek yogurt and cooked strawberries and raspberries. |
This pancake is everything I could ever want in a pancake :) It's fluffy, has a nice nutty flavor from the flaxseed, it's full of protein, and isn't too sweet, so it's easy to top it with things like a touch of maple syrup, butter or some yummy berries and yogurt.
The secret to success in this recipe is measuring the ingredients, and also using a non-stick pan. I know that non-stick pans are not at all the best choice health-wise, but there's really no alternative when you want to make some awesome pancakes.
Single Serving Protein Pancake.
serves one or two
15 grams / one serving of brown rice protein powder - I use Nutribiotic plain, you could use brown rice flour here also
50 grams / ~1/2 one normal sized banana, mashed
8 grams / 1 heaping Tbsp ground brown flaxseed
3 grams / 1 scant Tbsp ground chia seed
12 grams / ~1 tsp runny honey
2 eggs / about 100 grams give or take depending on your egg size
1 gram baking soda (this is a very small amount)
15 drops vanilla extract (I used a dropper)
pinch each: salt, ground cardamom
To make your pancake:
1) Combine all ingredients into a bowl and whisk well, scraping off the sides with a spatula and getting everything incorporated. The only lumps present should be a little bit of mashed banana. The batter will appear thin, and shiny from the eggs, resist adding more dry ingredients.
2) Preheat your nonstick pan on medium-low heat (#4 on my stove, point at small hand on the 7 in 7 o'clock).
3) Pour batter onto the pan. Do two batches, or pour it all in for one pancake (this is what I do). Cook on one side for about 5 minutes. Pancake is ready when there are some bubbles on top and you can see the edges are beginning to set. Work your rubber spatual around the edges of the pancake and also the bottom. One pancake requires one massive or two normal sized spatulas to flip it.
4) Flip pancake and wait another 1-2 minutes.
5) Remove pancake to a plate with banana slices already on it. Place pancake on top of sliced bananas. Drizzle with maple syrup or whatever is desired. I like to put some butter on top, berries and homemade yogurt. ENJOY!
| My first attempt; not quite right but topped with yum! |
![]() |
| Because someone will want the stats ;) Thanks to myfitnesspal.com |
I hope you are staying both warm and well this holiday season :) Love to all my readers :)
Merry Christmas!
PS - And no, this recipe will not work if you substitute the egg for something else.
Thursday, August 21, 2014
My Favorite Chia Pudding.
Most likely you've seen and heard about all the hype surrounding chia seeds. And most likely you've seen a gazillion recipes for "chia pudding." And... if you're like me, you wrinkle your nose and think sarcastically "really, how can THAT be good?!" Well this food craze wasn't going away, and I decided to stop being a baby and to stop saying "eww" inside my head when I hadn't even tried it. (You know that if you're a foodie, that's rule #1: Don't knock it till you try it). So I sucked it up and haphazardly threw some chia seeds in my smoothie bottle, poured in some vanilla, some this and that, enough liquid that looked appropriate, shook shook shook shook, and left it in the fridge to do it's thing.
Now I can easily say that the jokes on me people. The next morning, as I pulled the chia goo out of the fridge, I was skeptical. But I dipped my spoon in anyways and took a bite. My brain exploded. Holy cow how is this good?! This tapioca-like substance is SOOO not tapioca-like at all. I think I proceeded to eat half the batch I made right then and there. But then I showed restraint, because I knew I'd want some more yumminess later.
Ever since that fateful day, where I felt both like a Queen (hey hey, this girl tried chia pudding and LIKED it) and like a fool (this idiot waited too long to make omg-delicious-pudding), I've been experimenting with my own chia recipes. It is a little bit of a science and an art. You have to combine the right ratio of liquid to chia in order to get the right consistency. The right consistency may be firm after it has set overnight, or it maybe slightly more runny after setting overnight. But the best thing is, you can choose the texture of your pudding! See my tips after the recipe for getting this part right.
I've made this stuff with herbal coffee and coconut milk (divine), with coconut milk and vanilla (divine divine), and also with raw milk and vanilla. I like this recipe because it's the easiest of all, and it literally takes 1 minute to make. Have your roommate/partner/spouse come into the kitchen and time you. Real food doesn't have to take forever to make.
A couple notes, the quality of the liquid which you use as the base of your pudding makes the biggest difference here. In all the test-runs in my kitchen I've always used black chia seeds from my local Whole Foods or other awesome grocery store here in Seattle, so I can't speak for the other varieties of chia. But I do know that whatever milk you use DOES make an incredible difference. The milk I used here is non-canned Arroy-D coconut milk which comes in tetra packs. You can use other alternative milks, but it may make slightly different pudding. For instance, raw grass-fed milk has a much higher fat content than say rice and almond milks, so the end result has slight creaminess to it, and therefore milk alternatives like almond and rice probably will not. But really, this recipe is so versatile, and sure to please anyone in your family.
![]() |
| Someone obviously ate some already ;) |
Classic Vanilla Chia Pudding.
makes one quart mason jar
1 qt organic coconut milk, tetra-pak Arroy-D is my fav
1/2 cup whole organic black chia seeds
1/2 tsp vanilla extract
15 drops stevia clear liquid
To make your pudding:
1) Grab a clean mason jar with a tight fitting lid.
2) Add milk; add vanilla, add stevia
3) Pour your chia seeds into the jar.
4) Screw on lid and shake shake shake.
5) Put jar in fridge and go do something for 5 minutes. Come back, shake shake shake. Return to fridge, come back a few minutes later. Shake, shake, shake. Repeat.
6) Let puddin' do it's thing and get all yummy overnight.
Getting the texture right: Now I know that pudding is like brownies (cakey or fudgey?) and smoothies (thick or thin?), everyone has their own opinion about the perfect texture. This recipe features a pudding that holds together but is not either super firm or very runny. My advice? Start here. If you want the pudding a bit more thick, add a Tbsp of chia seeds and give it time to absorb into the liquid. After a few hours, if it's still too runny, add more, but please know that as this sits in the fridge it does get progressively (just slightly) less runny and a bit more firm as it continues to sit. If you like your puddings more runny, just add 1-2 Tbsp less chia, give it time to sit (4+ hours, overnight is best) and then see where you're at. Overall, very forgiving and you can adjust from there. But in general it's good to have a baseline recipe, and then you can easily switch up some of the ingredients to make it more interesting.
On a non-recipe note, I have been trying to enjoy my summer since it's post-basic science Boards! I am still in classes though, so even though I haven't been doing much studying (me need break) I haven't been sharing my new recipes with y'all. I've got a bunch of them on Notes on my iPhone, and I really need to get cracking, buckle down and make some of these babies and take photos of the yumminess and then share them with you!
Thanks for sticking around even though my posts are less regular as they used to be. Med school kind of re-prioritizes your life.
:)
Labels:
allergen free,
breakfast,
coconut milk,
dairy free,
easy,
family,
gluten free,
grain-free,
low carb,
low sugar,
organic,
Primal,
raw dairy,
raw milk,
real food,
soy free,
sugar free,
summer,
vanilla,
vegan
Friday, June 20, 2014
Paleo Chocolate Sauce or Ganache.
(Hello everyone :) I am alive! I've been busy (with medical school), but here I am again!)
Sauce or ganache? Why the fuss?
Well, technically, this is a "ganache" recipe... since ganache is composed of melted chocolate + cream (coconut milk here), which makes it spreadable and allows it to just barely harden into a lovely smooth chocolate experience.
Chocolate sauce, on the other hand, tends to be more of a more syrupy/sugary composition that is perfect for drizzling. Chocolate sauces commonly include corn syrup, or a simple syrup, which gives it a characteristic sweet smoothness that holds its shape when swirled and twisted on a spoon (and on top of your ice cream!)
This recipe rides in the middle. Best of both worlds, I'd say :)
And it's paleo, primal, gluten-free, soy-free, and barely sweetened (my favorite). Which by default makes it amazing. Obviously.
Paleo Chocolate Sauce.
makes enough for a crowd, or some for one and enough for later!
Time to prepare = < 10 minutes
3 oz unsweetened Baker's chocolate* - or 3 oz of your favorite
8 oz unsweetened coconut milk - this one is my favorite**
1 tsp to 1 Tbsp runny honey*** (or more to taste)
splash vanilla
dash unrefined sea salt
stevia drops - (optional and to taste)
To make your chocolate sauce:
1) In a double boiler, or a heavy bottomed pan, add chocolate chunks, coconut milk, honey. Heat on medium / medium-low until chocolate is melted. Whisk whisk whisk until smooth and entirely incorporated.
***To measure out the honey in this recipe, I usually stick a regular eating teaspoon into the honey, to get it moderately coated, and then place it into the chocolate sauce pan; I am estimating this is about 2 tsp to a whole tablespoon of honey. Feel free to use more if you want more sweetness.
2) Add vanilla extract, stevia (if desired) and salt. Whisk again. Taste. Add more stevia or honey if desired.
3) Enjoy! Dip in some strawberries, apple slices, spread on unsweetened pumpkin bread use to make into chocolate bark, use it as cake frosting (pictured); or put in a jar to use on ice cream! This sauce can do anything! Stored in the fridge this should last 1-2 weeks.
*I used the old size Baker's chocolate squares which I stocked up on right after they changed / halved the sizing of their packages.
** This brand is 100% coconut milk, and I can get it locally (if you're in Seattle, look at Central Market or PCC) for a great price (and no yucky canned coconut milk flavor!)
PS. I am now officially a third year medical student! I finished second year today. This will be a busy summer, as I am taking classes, starting clinic, and taking BOARDS in August, but you should hopefully hear more from me! I've got some recipes I've been meaning to share you guys. I hope to have some more time to get you some more yummies :) I know I've been completely MIA, and I appreciate my readers who still subscribe and share and benefit from my recipes!
PPS. The first picture is this chocolate sauce over my favorite grain-free gluten-free chocolate cake! (The sauce has harded at this point, and is exactly like a ganache!) I halved the ingredients to the cake and topped it with chocolate sauce, for a yummy dessert that is only minimally sweetened. The second picture is this chocolate sauce after being made, so it is still warm and in "sauce" vs ganache form. I love how versatile this recipe is!
XOXOOXO
Happy Day!
Sauce or ganache? Why the fuss?
Well, technically, this is a "ganache" recipe... since ganache is composed of melted chocolate + cream (coconut milk here), which makes it spreadable and allows it to just barely harden into a lovely smooth chocolate experience.
Chocolate sauce, on the other hand, tends to be more of a more syrupy/sugary composition that is perfect for drizzling. Chocolate sauces commonly include corn syrup, or a simple syrup, which gives it a characteristic sweet smoothness that holds its shape when swirled and twisted on a spoon (and on top of your ice cream!)
This recipe rides in the middle. Best of both worlds, I'd say :)
And it's paleo, primal, gluten-free, soy-free, and barely sweetened (my favorite). Which by default makes it amazing. Obviously.
Paleo Chocolate Sauce.
makes enough for a crowd, or some for one and enough for later!
Time to prepare = < 10 minutes
3 oz unsweetened Baker's chocolate* - or 3 oz of your favorite
8 oz unsweetened coconut milk - this one is my favorite**
1 tsp to 1 Tbsp runny honey*** (or more to taste)
splash vanilla
dash unrefined sea salt
stevia drops - (optional and to taste)
To make your chocolate sauce:
1) In a double boiler, or a heavy bottomed pan, add chocolate chunks, coconut milk, honey. Heat on medium / medium-low until chocolate is melted. Whisk whisk whisk until smooth and entirely incorporated.
***To measure out the honey in this recipe, I usually stick a regular eating teaspoon into the honey, to get it moderately coated, and then place it into the chocolate sauce pan; I am estimating this is about 2 tsp to a whole tablespoon of honey. Feel free to use more if you want more sweetness.
2) Add vanilla extract, stevia (if desired) and salt. Whisk again. Taste. Add more stevia or honey if desired.
3) Enjoy! Dip in some strawberries, apple slices, spread on unsweetened pumpkin bread use to make into chocolate bark, use it as cake frosting (pictured); or put in a jar to use on ice cream! This sauce can do anything! Stored in the fridge this should last 1-2 weeks.
*I used the old size Baker's chocolate squares which I stocked up on right after they changed / halved the sizing of their packages.
** This brand is 100% coconut milk, and I can get it locally (if you're in Seattle, look at Central Market or PCC) for a great price (and no yucky canned coconut milk flavor!)
PS. I am now officially a third year medical student! I finished second year today. This will be a busy summer, as I am taking classes, starting clinic, and taking BOARDS in August, but you should hopefully hear more from me! I've got some recipes I've been meaning to share you guys. I hope to have some more time to get you some more yummies :) I know I've been completely MIA, and I appreciate my readers who still subscribe and share and benefit from my recipes!
PPS. The first picture is this chocolate sauce over my favorite grain-free gluten-free chocolate cake! (The sauce has harded at this point, and is exactly like a ganache!) I halved the ingredients to the cake and topped it with chocolate sauce, for a yummy dessert that is only minimally sweetened. The second picture is this chocolate sauce after being made, so it is still warm and in "sauce" vs ganache form. I love how versatile this recipe is!
XOXOOXO
Happy Day!
Sunday, February 16, 2014
Protein Balls 1.0. (Cinnamon Almond).
As I talked about last time, I've changed my diet every-day-food-selection recently. More protein! Less carb! Easy to digest things! And among all that I've found the need for an afternoon or pre-dinner snack that fits the bill. I've been eating too many Lara Bar Lemon Pie ALT bars, and Quest bars, and it's just not sustainable. I needed something that I could make at home, that was less costly, portable, protein rich, with just a little fat and a low CHO content... and so this recipe was born! (Oh, and it had to be easy, since I've got a busy schedule over here!)
This photo was taken right after I rolled them, before the fridge. I made two different kinds this morning, one which I will share at a later date (notice the balls lighter in color in the lower left hand corner).
And daaang, these babies are so good I don't know why I didn't do something like this sooner. They are also very easily customizable to make different flavors, providing you keep the general ratios the same ;)
Protein Balls 1.0. (Cinnamon Almond)
inspired by deliciousness
1/2 cup homemade almond butter - or storebought - or nut butter of choice
1/2 cup rice protein powder - I use this one
1/4 cup ground flaxseed
2 Tbsp organic coconut oil, melted - source
1 Tbsp organic cinnamon - source
1 Tbsp local runny honey
1/4 tsp unrefined sea salt
1-2 Tbsp water (optional)
(Be precise on measurements for best results. I'm an eyeballer too, but definitely get out your measuring cups for this one!)
To make your protein balls:
1) In a large bowl, combine almond butter, protein powder, ground flaxseed, cinnamon, salt, honey. Mix a little. Then add melted coconut oil. Mix until a dough like texture forms. Add water if necessary, I've found that every mixture is slightly different, but I've found you usually won't need to add the water.
2) Divide the dough equally into 10 balls. Roll dough with clean hands into balls. Then store in an air-tight container in the refridgerator. (They will soften outside of the fridge, like if you take one out and put it in your purse for later.)
3) Enjoy!
If you make 10 balls, here are the (approximate) stats (thanks to MyFitnessPal):
Calories - 159 kcal
Carbs - 7 g
Fat - 9 g
Protein - 13 g
Not bad, huh? I am not an advocate of counting calories, but sometimes it's good to see where recipes stand, especially if your aiming for something like a high protein snack, which I was. You can always make bigger or smaller balls to suit your own snack needs.
This is a great kid-friendly recipe as well - pour all the ingredients into a bowl - let them mix it - and let them help you roll them into balls! But no snitching, otherwise you'll throw off your macros ;)
There you go! Your very own homemade "protein bar!" Woot! Enjoy - and stay tuned for other versions soon. I have a feeling I am going to be making these alot ;)
This photo was taken right after I rolled them, before the fridge. I made two different kinds this morning, one which I will share at a later date (notice the balls lighter in color in the lower left hand corner).
And daaang, these babies are so good I don't know why I didn't do something like this sooner. They are also very easily customizable to make different flavors, providing you keep the general ratios the same ;)
Protein Balls 1.0. (Cinnamon Almond)
inspired by deliciousness
1/2 cup homemade almond butter - or storebought - or nut butter of choice
1/2 cup rice protein powder - I use this one
1/4 cup ground flaxseed
2 Tbsp organic coconut oil, melted - source
1 Tbsp organic cinnamon - source
1 Tbsp local runny honey
1/4 tsp unrefined sea salt
1-2 Tbsp water (optional)
(Be precise on measurements for best results. I'm an eyeballer too, but definitely get out your measuring cups for this one!)
To make your protein balls:
1) In a large bowl, combine almond butter, protein powder, ground flaxseed, cinnamon, salt, honey. Mix a little. Then add melted coconut oil. Mix until a dough like texture forms. Add water if necessary, I've found that every mixture is slightly different, but I've found you usually won't need to add the water.
2) Divide the dough equally into 10 balls. Roll dough with clean hands into balls. Then store in an air-tight container in the refridgerator. (They will soften outside of the fridge, like if you take one out and put it in your purse for later.)
3) Enjoy!
If you make 10 balls, here are the (approximate) stats (thanks to MyFitnessPal):
Calories - 159 kcal
Carbs - 7 g
Fat - 9 g
Protein - 13 g
Not bad, huh? I am not an advocate of counting calories, but sometimes it's good to see where recipes stand, especially if your aiming for something like a high protein snack, which I was. You can always make bigger or smaller balls to suit your own snack needs.
This is a great kid-friendly recipe as well - pour all the ingredients into a bowl - let them mix it - and let them help you roll them into balls! But no snitching, otherwise you'll throw off your macros ;)
There you go! Your very own homemade "protein bar!" Woot! Enjoy - and stay tuned for other versions soon. I have a feeling I am going to be making these alot ;)
Thursday, January 30, 2014
"Good For You" Hot Cocoa.
I recently posted about this on my Instagram account, and it was one of my most popular posts, so I thought I'd better share the recipe!
Hot cocoa or hot chocolate has been one of my favorite things ever since I was little. Unfortunately what I had when I was younger was the very processed, very sugary, completely fake Swiss Miss from a package, mixed with hot water. It tasted good at the time, but it was definitely not good for me!
Hot cocoa does not have to be hard to make to be tasty, and it doesn't have to be loaded with fat and sugar either! My version is light, satisfying, and won't cause any blood sugar spikes, as it has virtually ZERO sugar. Cocoa is also rich in flavanoids and good fats. You could have this every day!
"Good For You" Hot Cocoa.
makes one serving (mine is a large 16 oz mug)
2 tsp - 1.5 Tbsp* unsweetened cocoa powder
pinch or two of real salt, to taste!
1 cup unsweetened organic almond milk (I like to add a touch of stevia, vanilla and real salt right to the carton to make it taste better); you can also use whatever other milk suits your fancy; I also recommend coconut milk, raw goat milk, and raw cows milk
1 tsp vanilla extract
1/2 to 1 dropper Stevia clear liquid (adjust to desired level of sweetness)
8-16 oz boiling water (depending on the size of the mug and how rich / thick you want it)
To make your hot cocoa:
1) Boil water.
2) In a small saucepan, heat up almond milk gently on the stove. Stir frequently!
3) In a dry mug, add cocoa powder and sea salt.
4) When water is boiled, let it settle, then pour about 1/4 cup into mug with cocoa powder.
5) Use a small whisk, or spoon, and stir vigorously, to incorporate all cocoa powder, and to be sure there are no lumps.
6) Slowly pour in hot almond milk. Stir, stir, stir!
7) Add vanilla and stevia. Stir. Taste. Top it off with some more hot water. Adjust if needed. You can't add more chocolate at this point, however, otherwise it will clump!
8) Enjoy your piping hot delicious chocolate beverage :) This does make enough for two people to have a cup, so if you're so inclined to share.. then share away! :)
*The reason there is a range on the cocoa powder is because sometimes I want it slightly less chocolatey (yes, that is possible) or sometimes even more chocolatey! There is room to vary it for taste. I usually stick around 1 Tbsp cocoa powder, though. You can use whatever type of cocoa powder you have on hand, just as long as it's unsweetened. I've made this with raw cacao powder, Ghirardelli cocoa powder, and Trader joes cocoa powder; all yield a good result, just with different flavors of chocolate!
This hot cocoa will really warm you up. What a perfect recipe for winter! For even greater warming effect, add a dash of warming spices like nutmeg, cinnamon and ginger!
Hot cocoa or hot chocolate has been one of my favorite things ever since I was little. Unfortunately what I had when I was younger was the very processed, very sugary, completely fake Swiss Miss from a package, mixed with hot water. It tasted good at the time, but it was definitely not good for me!
Hot cocoa does not have to be hard to make to be tasty, and it doesn't have to be loaded with fat and sugar either! My version is light, satisfying, and won't cause any blood sugar spikes, as it has virtually ZERO sugar. Cocoa is also rich in flavanoids and good fats. You could have this every day!
"Good For You" Hot Cocoa.
makes one serving (mine is a large 16 oz mug)
2 tsp - 1.5 Tbsp* unsweetened cocoa powder
pinch or two of real salt, to taste!
1 cup unsweetened organic almond milk (I like to add a touch of stevia, vanilla and real salt right to the carton to make it taste better); you can also use whatever other milk suits your fancy; I also recommend coconut milk, raw goat milk, and raw cows milk
1 tsp vanilla extract
1/2 to 1 dropper Stevia clear liquid (adjust to desired level of sweetness)
8-16 oz boiling water (depending on the size of the mug and how rich / thick you want it)
To make your hot cocoa:
1) Boil water.
2) In a small saucepan, heat up almond milk gently on the stove. Stir frequently!
3) In a dry mug, add cocoa powder and sea salt.
4) When water is boiled, let it settle, then pour about 1/4 cup into mug with cocoa powder.
5) Use a small whisk, or spoon, and stir vigorously, to incorporate all cocoa powder, and to be sure there are no lumps.
6) Slowly pour in hot almond milk. Stir, stir, stir!
7) Add vanilla and stevia. Stir. Taste. Top it off with some more hot water. Adjust if needed. You can't add more chocolate at this point, however, otherwise it will clump!
8) Enjoy your piping hot delicious chocolate beverage :) This does make enough for two people to have a cup, so if you're so inclined to share.. then share away! :)
*The reason there is a range on the cocoa powder is because sometimes I want it slightly less chocolatey (yes, that is possible) or sometimes even more chocolatey! There is room to vary it for taste. I usually stick around 1 Tbsp cocoa powder, though. You can use whatever type of cocoa powder you have on hand, just as long as it's unsweetened. I've made this with raw cacao powder, Ghirardelli cocoa powder, and Trader joes cocoa powder; all yield a good result, just with different flavors of chocolate!
This hot cocoa will really warm you up. What a perfect recipe for winter! For even greater warming effect, add a dash of warming spices like nutmeg, cinnamon and ginger!
Saturday, December 21, 2013
Grain-free Granola 2.0.
About a year ago I made some delicious grain-free cinnamon raisin granola for the first time. It was seriously delicious. So recently I went to go make some, and the search bar in my blog wasn't working... anyone else having this problem?! So I ended up wingining it, trying to remember just what I did, and it came out great! Even better than the first version if I do say so myself.
This grain-free granola is crunchy, toasty, and packed full of flavor! Everyone in your family will love it, and they will all have a hard time believing that yeah, there are no oats in here! You could even make a batch of this granola, put it in cute little jars, and give it away as Christmas gifts! But everyone just might hound you for the recipe ;) No worries, feel free to share!
PS - If cinnamon and raisins aren't your thing, try another spice combo, like cranberries and cardamom, or nutmeg and dried blueberries, or apricots and cloves! Feel free to switch it up to your liking.
| These were filled to the tippy tippy top, BUT I ate some ;) |
Grain-free Granola 2.0.
makes 2 gallon sized mason jars full (even with extensive recipe sampling ;)
* these ratios are generalized, really just throw all your favorite nuts combination in a large bowl; for instance, I didn't use cashews or peanuts, but feel free to use these if you wish
1/2 cup each:
sesame seeds, sunflower seeds, whole macadamia nuts*, whole pecans, whole walnuts
1 cup each:
pumpkin seeds, whole pecans, sliced almonds, raisins
1 cup each:
ground macadamia nuts*, ground pistachios, ground walnuts
1-2 cups organic coconut "chips" (largely flaked coconut)
1 cup organic shredded coconut (small little shreds of coconut, not traditional sized flakes)
2 large eggs
1 - 2 Tbsp cinnamon
1/3-1/2 cup brown rice syrup
~1/4 cup runny honey
To make your yummy granola:
1. Preheat oven to 375 degrees; mine was non-convection.
2. Combine nuts, coconuts, cinnamon, brown rice syrup, and honey. Mix together. Add in both eggs and stir well with a wooden spoon.
4. On two parchment paper lined baking sheets, spread the mixture evenly between two pans.
5. Bake at 375 for 10-15 minutes. Watch it, uneven ovens may burn. Stir well. Bake another 10 minutes or so. Stir. Depending on your oven, you may need another a longer or shorter time. For me, it varies a little on every batch.
6. When done, remove from oven and let cool on pans. The granola will crisp up considerably as it cools and even more after you put it in jars and taste it the next day.
*My macadamia nuts were roasted and salted, so I did not add salt to the recipe. If you don't have any pre-salted nuts in your mixture and they are all raw, I suggest adding a teaspoon or two of salt, to your taste.
I cannot be held responsible for any granola-lovers who ingest too much granola during the making of this recipe. WARNING - This granola is dangerously good. Serve it straight out of the jar as a snack, with some cold raw milk or coconut milk in the morning like "cereal" or even on top of your favorite greek yogurt or ice cream. Or even a fruit parfait! Use as you would any "regular" granola, but be aware that this granola is substantially more calorie dense, so you can eat way less and still feel just as satisfied ;)
Yum! Enjoy :)
Saturday, June 22, 2013
How To Make Peanut Butter More Nutritious.
Despite what a lot of people say, I think it's really tough to eat real food on a budget. Sure, real food costs SO MUCH less than processed foods, but for a girl like me that's only learned to shop for real food, I feel like I pay so much each week and month! Even though this happens, my philosophy is that I would rather pay for food now, and take care of my body, than I would to pay the doctor later.
A few weeks ago I had an extreme craving for peanut butter. I generally avoid the stuff since peanuts are a legume, and legumes should be soaked and cooked before eating like their cousin the bean family. Peanut butter in general is also very hard to digest for many people, and those of us who are allergic to soy can cross-react with peanuts. Peanut butter also contains a good amount of aflatoxin, a toxic substance in the mold created by specific microorganisms that grow on peanuts. Buying organic peanut butter is best for limiting your aflatoxin exposure, but doesn't negate it entirely.
I have been learning how to listen to my body, so I bought some peanut butter. I think I went through 2 jars in the next two weeks before my cravings for it subsided. And then the addictive cravings started to happen, and because I know the difference between those two types of cravings, I started to cut back. As the weeks of my last quarter of medical school wore on, I still ate the peanut butter here and there, and even started making some peanut butter smoothies in my Vitamix (= mistake, they are so good!). But around the same time I noticed my digestion starting to get worse. Could it be the peanut butter? I did some experimenting and found that it was indeed causing my painful cramping and bloating. Clearly my body can only handle so much peanut butter.
But back to my real reason for this post. Bottom line is that real food costs money. There are several ways to help alleviate the expense, like buying in bulk, sharing with other people, buying meat one from source and freezing it, buying lots of a certain item when it's on sale, buying from farmers markets, and my favorite: always asking "do I really need this?" I find that 75% of the time the answer is no. At the end of the day, all I really need is some good quality protein, lots of veggies, and some fat. One thing that can help the food budget is making compromises where you're comfortable. For many, peanut butter can be a cheap and decent source of protein and fat. But how do you make it even more nutritious? That's where this post comes in.
When I was buying peanut butter a few weeks ago, I had the idea of pouring off the naturally separated peanut oil and replacing the peanut oil with good quality coconut oil. The results were easy and delicious! With each spoonful I knew I was getting some good quality MCT's from the coconut oil, which are great fuel source for the body and keeping your metabolism strong. Removing most of the peanut oil also decreased the amount of Omega-6 fatty acids that my body was getting. Having a low Om6/Om3 ratio in our bodies is vitally important for staying healthy.
To make your peanut butter more nutritious:
1. Buy your favorite natural creamy unsalted peanut butter, organic is best. Make sure that the oil has separated on the top. If not, try reaching to the back of the shelf and grabbing one that has separated.
2. At home, take the lid carefully off the jar and gently pour off the separated peanut oil. I like to tilt my jar around a few times to get as much off as possible.
3. With a large spoon, take about the same amount of coconut oil and stir it into your peanut butter. STIR well! These are fun, or do it by hand. If you don't like the taste of coconuts, you're seriously at the wrong blog, but nevertheless I will tell you that it does NOT make the peanut butter taste coconutty.
4. Lastly, add your favorite unrefined sea salt to the mix. Stir well again.
5. Sample some off the spoon/knife to double check that it is delicious. Some people like more or less salt.
6. Then stick your peanut butter in the refridgerator! It will solidify a little and will spread just like Jiff! But without all the gunk! As it sits out at room temperature on your spoon it will start to melt a little and be more runny. ENJOY!
If peanut butter isn't your thing, or if you prefer almond butter, try this with storebought almond butter!
If you'd rather make your own homemade nut butter, check out this cashew cookie butter recipe. Or use either storebought or homemade almond butter to make some cinnamon honey almond butter, or what I like to call CHAB. Which my mom is obsessed with and she calls me every so often saying "Guess what I made today! CHAB!"
One final note: Adam's brand peanut butter is the PNW's equivalent to Smuckers on the East Coast, or Laura Scudders down in California. I've liked these kinds before, so it was cool to learn it's all the same company. Kind of like Dreyer's ice cream vs Edy's ice cream on the West Coast vs East Coast.
Happy mixing!
Sunday, March 24, 2013
Grain-free Coconut flour Spice Cake.
Calling this recipe cake isn't really fair. Calling this recipe bread isn't really fair either. It is actually similar to both, but with the best parts of each. Light and airy (bread), but sweet and satisfying (cake). Remember when I promised you I'd post other versions of my lemon poppyseed cake? Well, this is actually my original recipe, as I made first made a spicy version, but instead shared the lemon poppyseed recipe with you all before this version, since I hadn't taken proper pictures.
This recipe reminds me of gingerbread, but without all the heavieness or sugar content of a thick cake, as this is more light and airy; something that you can eat everyday. It's great by itself for a snack, or on the side of a salad for paleo/primal friendly treat. I like to make this on the weekend and slowly eat the pan down over the next two weeks. This would free great too!
Grain-free Coconut flour Spice Cake.
makes one 9x13 pan
1/3 cup organic coconut oil - source
2/3 cup warm water
6 happy eggs
1/3 cup + 2 Tbsp (or 1/3 cup heaping) organic coconut flour - source
2 Tbsp honey - mine was wildflower runny honey
2 Tbsp molasses
1 tsp baking soda
1/4 tsp unrefined sea salt
1 Tbsp organic cinnamon
3 Tbsp ground ginger
3 dashes ground nutmeg
2 dashes ground gloves
To make your lovely simple spice cake:
1. Place coconut oil and warm water in a medium sized bowl, whisk vigorously for about 2 minutes or until white, glossy and homogenous (and no longer clumpy).
2. To the same bowl, add flour, and remaining ingredients. Whisk until incorporated.
3. Pour batter into a greased 9x13 pan (I used coconut oil), and bake at 350 degrees non-convection for exactly 20 minutes.
4. Pull pan from the oven and place on a baking rack to cool. Transfer to the fridge to cool some more. Cut into squares when cool, and spread with your favorite filling. I used grass-fed butter! Yum! Tahini, peanut or cashew butter would go nicely with these too.
Other spices like cardamom and allspice would be great in this cake too! Use your favorite warm spice combination :)
Sunday, March 3, 2013
Meat + Egg Protein Bites.
I am finding that I have very little time for cooking now that I am in medical school, and I've been searching for easier and easier ways of eating home cooked real food that doesn't take a lot of time, or create a lot of dishes, which I will inevitably have to do myself.
One evening as an experiment (and since I was short on time), I took some grass-fed ground beef which I had defrosted, stuffed it into a mini muffin tin, and baked it. Turns out my experiment worked very well, and I decided to do it on a larger scale. This time I used a normal sized muffin tin and cracked an egg on top - a definite success!
This recipe is so easy because all you have to do is take your meat of choice, section it into a muffin tin, press down and bake! In less than a half hour you have easy bites of protein which can be conveniently topped on a salad, warmed with a side of veggies, or eaten quick and on the go. I seasoned mine with only a little bit of salt, but feel free to sprinkle on top whatever spice you fancy. Cheese and ketchup were my other experiments, which turned out great too! Please note - do not grease the muffin tins, there is enough fat in the meat and there will be no sticking. The meat actually shrinks away from the sides and will look like it's "swimming" in fat when you take them out of the oven. I really like this because you can so easily lift out each little bite / piece and place on a paper towel, and then discard (or save) the meat fat / tallow that has rendered out of the meat!
Meat + Egg Protein Bites.
makes 1 dozen
1 lb grass-fed ground meat - I used pet burger
12 pastured happy eggs
sprinkle unrefined sea salt
spices - optional
ketchup - optional
cheese - optional
To make your protein bites:
1. Evenly section out beef between the holes of a normal sized muffin pan.
2. Press down with your fingers. Add optional spices or cheese.
3. Crack an egg on top. Sprinkle each with unrefined sea salt
4. Bake in a preheated oven at 350 degrees (don't believe mine is convection), for 25-30 minutes. Bites will be ready when eggs are cooked through. Remove from oven and promptly grab bites out of the tin with tongs, placing then on a paper towel drain. When cool, store in a glass container in the fridge for grabbing whenever you need some protein :) ENJOY!
Even though this idea is quite simple, they taste so good. It would be possible to make this with ground chicken, turkey or bison, but I would suggest greasing the sides of each muffin cup with olive oil first; these meats have very low fat content and therefore may stick.
I hope you find these a useful addition to your food plans for busy weeks :)
One evening as an experiment (and since I was short on time), I took some grass-fed ground beef which I had defrosted, stuffed it into a mini muffin tin, and baked it. Turns out my experiment worked very well, and I decided to do it on a larger scale. This time I used a normal sized muffin tin and cracked an egg on top - a definite success!
![]() |
| This is the what the underside looks like :) |
This recipe is so easy because all you have to do is take your meat of choice, section it into a muffin tin, press down and bake! In less than a half hour you have easy bites of protein which can be conveniently topped on a salad, warmed with a side of veggies, or eaten quick and on the go. I seasoned mine with only a little bit of salt, but feel free to sprinkle on top whatever spice you fancy. Cheese and ketchup were my other experiments, which turned out great too! Please note - do not grease the muffin tins, there is enough fat in the meat and there will be no sticking. The meat actually shrinks away from the sides and will look like it's "swimming" in fat when you take them out of the oven. I really like this because you can so easily lift out each little bite / piece and place on a paper towel, and then discard (or save) the meat fat / tallow that has rendered out of the meat!
Meat + Egg Protein Bites.
makes 1 dozen
1 lb grass-fed ground meat - I used pet burger
12 pastured happy eggs
sprinkle unrefined sea salt
spices - optional
ketchup - optional
cheese - optional
To make your protein bites:
1. Evenly section out beef between the holes of a normal sized muffin pan.
2. Press down with your fingers. Add optional spices or cheese.
3. Crack an egg on top. Sprinkle each with unrefined sea salt
4. Bake in a preheated oven at 350 degrees (don't believe mine is convection), for 25-30 minutes. Bites will be ready when eggs are cooked through. Remove from oven and promptly grab bites out of the tin with tongs, placing then on a paper towel drain. When cool, store in a glass container in the fridge for grabbing whenever you need some protein :) ENJOY!
Even though this idea is quite simple, they taste so good. It would be possible to make this with ground chicken, turkey or bison, but I would suggest greasing the sides of each muffin cup with olive oil first; these meats have very low fat content and therefore may stick.
I hope you find these a useful addition to your food plans for busy weeks :)
Monday, January 28, 2013
Grain-free Lemon Poppy Seed Coconut Flour Cake.
It's a rather odd sounding title, isn't it? This recipe was a spin off my primal gingerbread cake, as well as my grain-free waffle recipe. I wanted a simple coconut flour-based grain-free baked good that I could whip up fast and was super easy. So I experimented, and made this! It was delicious on the first go! This cake has just the right amount of cakey-ness to satisfy my (occasional) bread cravings, but without being loaded with sugar or refined gluten-free grains. It is also nut-free and Paleo! My first version was a spiced flavor with lots of ginger and a touch of molasses, and my second (this version) was lemon poppy seed, but feel free to change spices and flavor extracts for a different taste. I know I will be sharing several different versions as time allows me :) This bread bakes thin in the pan, so I used two squares and spread some grass-fed butter in between both sides, to make little "sandwich" looking treats. The whole batch lasted me nearly two weeks, and I was very happy to have something interesting (besides veggies) to nibble on at lunch time :) It's also a great way to add some more coconut oil and grass-fed butter to your diet, which are rich in good for you saturated fats and fat-soluble activators, which our bodies, brains, and hearts desperately need!
Grain-free Lemon Poppy Seed Coconut Flour Cake.
makes one 9x13 pan
1/3 cup organic coconut oil - source
2/3 cup warm water
6 happy eggs
1/3 cup + 2 Tbsp (or 1/3 cup heaping) organic coconut flour - source
1/4 cup honey - mine was wildflower runny honey
1 tsp baking soda
1/2 tsp organic lemon extract
2 tsp poppy seeds
zest of one organic lemon
To make your lemon poppy cake:
1. Place coconut oil and warm water in a medium sized bowl, whisk vigorously for about 2 minutes or until white, glossy and homogenous (and no longer clumpy).
2. To the same bowl, add flour, and remaining ingredients. Whisk until incorporated.
3. Pour batter into a greased 9x13 pan (I used coconut oil), and bake at 350 degrees non-convection for exactly 20 minutes.
4. Pull pan from the oven and place on a baking rack to cool. Transfer to the fridge to cool some more. Cut into squares when cool, and spread with your favorite filling. I used grass-fed butter! Yum! Sun-butter or cashew butter would go nicely with these too.
Spread something fun inside and enjoy :) PS-- Don't you love my plates! I found them last year at Sur La Table, and I absolutely love them! I'm so happy they survived the trek from Southern California to Seattle!
Labels:
allergen free,
breakfast,
butter,
cake,
coconut flour,
coconut oil,
dairy free,
easy,
egg,
gluten free,
grain-free,
honey,
low carb,
low sugar,
lunch,
organic,
Primal,
quick bread,
snack,
soy free
Subscribe to:
Posts (Atom)