Showing posts with label sorghum. Show all posts

Monday, January 18, 2010

Cinnamon Scones

My lovely brother has been begging for scones lately. And considering he gave me this pan for Christmas, the making of scones today (we are having another snow day) was unavoidable. He requested cinnamon scones especially so I sought out a recipe and went to work!

Cinnamon Scones
adapted from Chelsea Lincoln

1/2 cup organic coconut flour
1 cup sorghum flour
1/4 cup potato starch
1 cup organic cane sugar
1 Tbsp baking powder
1/2 tsp sea salt
2 tsp cinnamon
1 cup raw whole buttermilk
1/3 cup butter
turbinando sugar crystals, for sprinkling

To make your scones:
1. In a large bowl, combine all the dry ingredients.
2. Using a pastry cutter, work the butter into the flour mixture until it resembles small peas.
3. Pour in buttermilk and stir until moistened.
4. Spoon batter into a greased scone pan or cut into 8 separate scones and place on a baking sheet.
5. Bake at 450 degrees until the tops have browned and the scones do not feel overly puffed up in the middle.
6. LET COOL - if you try to eat one too soon it will crumble!

This recipe tasted amazing. My brother could not wait until breakfast in the morning, so I pulled out a still warm scone (that's why I know about the crumbling) and we all sampled a piece. G still eats wheat, so to see his face light up in reaction to the taste of this GF scone, it speaks volumes! We all agreed that this is definitely a great scone recipe. The recipe called for other various mix-ins. Try it with chocolate chips, lemon zest, raisins, coconut, nuts, dried fruit, or whatever you like best in your scones. Also, if you don't like your scones very sweet, decrease the sugar.

*Note- I was not happy with the way the scones cooked. I might decrease the oven temperature to 400 degrees and see what happens. Also, next time I will be adding some xantham gum to help hold the crumb together. When they are fully cool in the morning I will tell you if the crumbling is better. I will also upload a better photo!

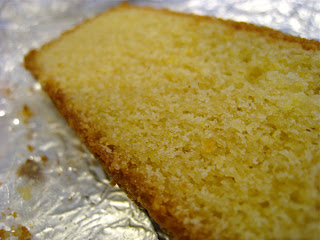
1/20/10 - The scones are still crumbly. But as I anticipated, a completely cool scone comes out of the pan nicely (as long as they were greased). Next time, which will be soon since G only has 2 scones left, I will add some xantham gum and adjust oven times/temperatures. Unbelieveably (haha!), last night G ate the scone that I had prepped for this mornings photo shoot! So these photos are not as pretty as I wanted them, but as my mom always says "It doesn't matter what it looks like, it's all going to the same place anyway" - which is funny, but I must admit I do not entirely agree. Making a pretty presentation is fun! Look at the texture those scones!

1/28/10 - I made these scones again. I added a pinch of xantham gum, decreased the sugar by 1/2 cup and decreased the oven temperature to 400 degrees. They cooked for 20 minutes. End result: they did not crumble as much, they were less cinnamony, they were more dense and not as airy, and were less sugary. The no crumble factor is no doubt because of the xantham gum, yipee! That part is fixed. I think I decreased the sugar too much, I will probably do 3/4 cup sugar next time or add some stevia or honey; stevia for sweetness, honey for moisture. I do not know why they tasted less cinnamony - maybe I will up the cinnamon factor even more and do a whole tablespoon! I will also increase the oven temperature to 425 degrees, the puff factor of the scones was less than last time (the scones were more dense) so upping the oven temperature will help the scones rise more quickly. Stay tuned for this summer when I will have some time to finalize this scone recipe.

Thursday, January 7, 2010

Banana Cake


Banana cake. Everyone needs to have a recipe. Why? It's good, and if you've never had some you won't really understand. Like bananas? Try it! Don't like bananas? Try it! It's like an amazing win-win situation.

It tastes like: bananas and goodness. It is sweet with a gooey cake texture. You will not believe that this cake is not only nourishing, but good for you!

This stuff is so good I almost died. Enough said.

Banana Cake
    makes one 9x13 pan

Cake:
  2 1/2 cup  mashed bananas
  1/2 cup  organic coconut oil
  1/2 cup  organic maple syrup
  10-12 drops  liquid stevia
  3  REAL eggs
  1/2 cup  organic coconut flour
  1/4 cup  sorghum flour
  1 tsp  baking soda
  1 tsp  baking powder
  1 tsp  sea salt
  pinch  xantham gum
  1-2 tsp  cinnamon

Topping:
  2 Tbsp  grassfed butter
  1/2 cup  ground walnuts
  2 tsp  organic cane sugar
  2 Tbsp  packed organic light brown sugar

To make your banana cake:
     1.  Preheat the oven to 350 degrees and grease a glass 9x13 pan. I like to use left over butter wrappers or Misto olive oil spray.
    2.  In a large bowl sift together dry ingredients.
    3.  In a small bowl, mash bananas with a potato masher. Add maple syrup and stevia.
    4.  In another small bowl beat eggs.
    5.  To the large bowl with dry ingredients, add wet ingredients: mashed bananas, eggs and melted coconut oil. Fold together with a spatula until combined.
    6.  To make the topping - place all ingredients in a bowl and use your fingers to smoosh the butter into the sugar and walnuts to make a crumbly mixture.
    7.  Pour batter into prepared pan and sprinkle with walnut topping.
    8.  Bake at 350 for about 30 minutes or until the top has set and a stick inserted through the cake comes out clean. Let pan + cake cool on a wire rack overnight. Eat for breakfast the next day. Restrain eating it all yourself.

Look at the texture. I pulled apart a corner of it so you could really see the yummy banana insides. Well, actually the cake was like that when I got there. Someone was having fun with the cake or eating it or something. And as you can see, it's almost gone. We all definitely did that.

Like I said before, this cake is so good I almost died. I almost died yesterday at breakfast, and the day before, and today. Almost dying when it comes to baked goods is good. Very, very good. Unless it's your neighbor dropping a piano on your head from the 40th flour because the burned cookie smell is drifting into his window. That is not advised.

Tuesday, December 29, 2009

Gluten-free Lemon Bread.


My grandmother has been responsible over the years, as are most grandma's, for always bringing certain baked goods to family functions.  I can remember Mimi bringing her lemon bread to every Thanksgiving, Christmas, and Easter celebration ever since I can remember family gatherings!  It is especially popular with my immediate family and my brother G usually steals/eats most of the loaf.  Ever since my Mom + Dad and I have needed to be gluten-free, we've missed lemon bread.  My brother begs for me to make it and I had never attempted a gluten-free version until now.

Normally I would try to make a recipe more healthy, but some recipes are just favorites and just cannot changed too drastically.  This is not an everyday quick bread, so making it an extremely quick bread was not high on my priority list.  Also because I use real grass-fed butter, there is certainly some vital nutrition to this yummy quick bread!

Gluten-free Lemon Bread
     adapted from the kitchen of my Grandmother
     yields one loaf

    6 Tbsp grass-fed butter (I always use Kerrygold)
    1 cup sugar (I used organic cane sugar)
    2 REAL eggs
    1 1/2 cups gluten free flour (1/2 cup brown rice flour, 1/2 cup tapioca flour, 1/4 cup arrowroot, 1/4 cup sorghum)*
    1 tsp baking powder
    pinch salt
    1/2 cup raw whole milk
    1 whole lemon, zested

topping:
    1/2 cup walnuts, ground or chopped
    1 lemon, juice of - optional
     1/3 cup sugar - optional

To make your lemon bread:
  1.  In a medium bowl, cream butter and sugar.
  2.  Add eggs one at a time, beating well after each addition.
  3.  In a separate bowl, mix together gluten free flours, baking powder, and salt.
  4.  Slowly incorporate the dry into the wet, beating on low speed. Add milk and lemon zest.
  5.  Sprinkle top with walnuts.
  6.  Pour into greased or MISTOed normal sized loaf pan.
  7.  Bake at 325 for over an hour, or until the bread has browned and a toothpick comes out clean.
  8.  Optional step: In a small bowl, whisk together lemon juice and sugar. When the bread comes out of the oven and is still hot, pour the mixture over the top and allow it to soak through. This is so delicious, but I sometimes I leave it off because the bread has adequate amounts of sugar already.

*Feel free to use whatever combination of gluten free flours are your favorite.  Depending on what I am baking I mix together flours that I think will achieve the texture and flavor I want.  This combination was perfect!  In general, my family and I really tend to like sorghum, arrowroot, brown rice, teff, almond, and coconut flours the best.  These flours also offer some great nutrition, which is often missing in gluten free baking.  I will never go back to the white rice flour, potato starch and tapioca mixture that lots of gluten free bakers use because it is so nutritionally devoid (not to mention high in starch, sugar and calories, and low in protein and fiber).  We also do not like bean flours, and I generally never cook with them.

In general, this lemon bread has always been a little bit crumbly, even in the original wheat version, so don't worry if there are crumblies here and there.  It is quite tasty though and my whole family agrees.  This recipe has been passed down for generations!

I'm sorry about the pictures - but this was the last piece left!  I should have taken a picture right away before everyone ate it!

Update -- I will be making a grain-free version of lemon bread in the future!

Saturday, August 29, 2009

Morning Glory Muffins 1.0.


When I formerly ate wheat, I used to have carrot "Morning Glory" muffins at camp in the mornings when they were available. The muffins were quite good, but they were very oily and not very healthy. When I discovered I needed to be gluten free, I eventually got around to finding a new recipe for them.

I believe that I originally found this recipe online at Whole Foods. I have adapted it a little to my taste and to make it more healthy. I cannot say more of these muffins! They are moist, not overly fluffly or heavy, and have lots of yummy ingredients in them. The photo does not do them justice! It was taken maybe a year ago on my older camera, which never turned out good photos. Also, ignore the poor photo shown in the linked recipe, it's not a good representation of how they actually turn out! The photo makes them appear very dry, but they are not!

Morning Glory Muffins 1.0.
    adapted from Whole Foods Market recipes 
    makes about 18 muffins

    3  happy eggs
    1/2 cup  organic cane sugar  (or 1/2 cup maple syrup and reduce flour by 3 tablespoons)
    1/4 cup  brown sugar
    2/3 cup  organic coconut oil - source
    1 tsp  vanilla extract
    1 cup  brown rice flour
    1/2 cup  tapioca starch
    1/2 cup  potato starch
    2 tsp each:
        baking soda
        cinnamon
        xanthan gum
    1/2 tsp  unrefined sea salt

Mix ins:
    1 tart red apple, unpeeled cored and finely diced
    1 cup  grated carrot
    1 cup  grated zucchini
    1/2 cup  organic raisins
    1/2 cup  chopped walnuts
    1/4 cup  coconut flakes

To make your muffins:
  1. Preheat oven to 350 degrees.
  2. Combine the wet ingredients in a large bowl, whisking by hand to incorporate air into the mixture about 1 minute.
  3. Combine the dry ingredients in a separate bowl and add to the wet ingredients gradually.
  4. Add the mix-ins last, gently folding with a spatula till combined.
  5. Scoop into paper lined regular sized muffin tins.
  6. Bake for about 20-30 minutes, until slightly golden brown on top; Cool, eat, enjoy.

My mom is especially crazy about these muffins! I love these muffins too, but I do not really love that they use so much white flour. I will experiment and make them with better gluten free flours like teff, or sorghum, flours that aren't as starchy and "empty" calorically. (Now that my diet has improved over the years, I have learned that grains are not the best thing for our bodies. Coming soon I will redo the recipe with more healthful flours, like coconut and almond.)

These muffins freeze well for a few months, but past six months is pushing it for ANY gluten-free baked good and so I do not recommend it. Also, be sure to store your gluten-free frozen goods in a freezer that does not have defrost cycle. The defrost cycle will damage the product over time, and it will not keep as long. Of course, if you have family or lots of friends that love muffins, they will be gone in flash and you won't have to worry about freezing them!

Sunday, January 11, 2009

Buffalo Bean Soup and Classic Cornbread


This past week and a half has been filled with lots of baking (several snow days have kept me inside) and now I am finally getting around to posting it all.

Since being home we have eaten dishes with lamb, turkey, beef, pot roast, and most recently, I have been experimenting with buffalo. I especially thankful for all this lovely variety at protein, since when I am at school my protein choices are limited.

Sometime back in my childhood I remember going to some restaurant somewhere up in Northern New Hampshire, maybe North Conway? where I had my first taste of buffalo. Buffalo is different than beef in texture, taste, fragrance. The way it browns in a hot pan as you break it up with a knife is different than beef. The ground variety is less stringy. Brown both side by side in a pan and you will see what I mean. When they both cook up, the mountainous curves and bumps of the buffalo meat looks uniquely different than the beef. The taste of buffalo is so mild, and not at strong as beef.

That was, however, my first and last taste of buffalo for a while, until now. As I have become increasingly willing to experiment and I have demonstrated that I am capable of cooking (3 years working in foodservice really helped) my mom has let me go wild in the kitchen.

Well, maybe not wild.

But this soup is wild- wild on taste. It took my Dad one bite to declare, "This recipe is a keeper. I hope she wrote it down so we can make it again!"
Music to my ears!

Buffalo Bean Soup
serves 4 to 6 people, or less with leftovers

1 1/2 tsp coconut oil
1 pound grassfed organic ground buffalo meat
1/2 pound grassfed organic ground beef
1 half vadalia onion - diced
2 1/2 cups beef broth (I used Imagine)
2 1/2 cups water
1 can lightly drained corn
1 can lightly drained adzuki beans
1 can baked beans (be sure this is GF)
1 half vadalia onion - diced
1 orange bell pepper - diced
1/2 cup baby carrots - diced (use more or less depending on how much you have or how much you like carrots)
1 1/2 tsp chili powder
1/2 tsp: black pepper, cayenne pepper, cumin, salt
dash oregano, thyme
2 mildly heaping tsp arrowroot + water

To make your soup:
1. Place soup pot on the stove top. On medium heat, brown onion with coconut oil then add the buffalo and beef cook through. Do not drain off the fat- this is very nourishing!
2. Add the beef broth and water, diced pepper, carrots, onion, can of corn and both cans of beans. Add spices.
3. Let cook on medium heat, stirring often for about an hour. Cook for 30 minutes longer or until peppers, carrots and onions are soft.
4. Serve with cornbread.

It is very moist as cornbread should be, but it is not a super cakey gooey cream cornbread. Those types of cornbreads made with lots of dairy and creamed corn are not typically what cornbread is really about. This cornbread has a nice crumb, a balance of corn and textures of the other flours with a hint of sweetness. Next time I may try adding a whole can of corn so there are actual corn kernels.

Classic Cornbread
adapted from this website

1 cup stoneground cornmeal
1/4 cup uncooked polenta
3 Tbsp almond flour
1 Tbsp brown rice flour
1/4 cup brown rice flour
1/4 cup white sorghum flour
1 tsp baking soda
2 tsp baking powder
1/2 tsp: xantham gum, salt
2 REAL eggs (from grassfed chickens)
1 cup unsweetened almond milk (Pacific) or raw whole milk
1/4 cup coconut oil - melted (Spectrum Organics) or grassfed butter
1/4 cup organic maple syrup

To make the cornbread:
1. Combine the wet and combine the dry in 2 separate bowls.
2. Add the wet to the dry and mix well.
3. Pour into a 9 X 9 X 2 baking dish.
4. Bake at 400 degrees for about 25 minutes, give or take depending on your oven.
5. Cut into squares. Serve with Buffalo bean soup.
6. Optional: make a mixture of 3 parts agave, one part honey. Microwave/zap for 30 seconds or until warm and fluid. Serve in a little pitcher for drizzling over cornbread.

My family and I ate this for dinner. It was a lovely feast for three. And we have leftovers!