Friday, January 28, 2011

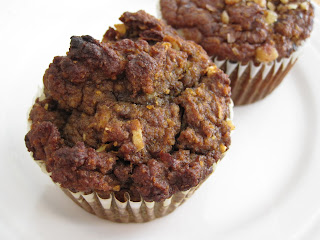
Grain-free Pumpkin Muffins.


My mom found this recipe over at Amy's Simply Sugar & Gluten-free blog sometime before Thanksgiving. The original recipe was submitted in her Slightly Indulgent Tuesday's carnival by another blogger. Unfortunately when my mom printed out the recipe, it didn't say who made them! My mom was adventurous and made some edits to the recipe (go Mom!) which were spot on. So here is her lovely delicious creation.


I cannot say enough of these muffins! They are incredibly moist and have great flavor and texture. She was kind enough to ship me a whole package of these muffins when I was away at school over Thanksgiving. I shared them with all my "not gluten-free" friends and they LOVED them. They couldn't even tell they were gluten-free, and EVERY SINGLE person asked for the recipe. After much waiting, here it is! My mom also served them at her own Thanksgiving feast she hosted and NO ONE knew that they were gluten-free. The plate disappeared. Obviously people enjoyed them :)


We currently have a whole bag of these at our house in the freezer. Whenever we need a muffin fix we take one out and pop it into the toaster oven to warm up. All it takes is ten minutes and you have a warm yummy muffin.  These freeze very well! This will definitely be my new "to-go-to" recipe when I need to make muffins. Which reminds me, I need to remake my Morning Glory Muffin recipe without the grains and the sugar!


Grain-free Pumpkin Muffins
    makes about 2 dozen muffins

    2 cups  blanched almond flour
    1 tsp  baking soda
    1/2 tsp  sea salt
    1/2 tsp  each: nutmeg, allspice, cloves
    1 cup  pumpkin puree
    3 real eggs - ours were large!
    1/4 cup  organic extra virgin olive oil
    1/2 cup  honey/maple syrup
    1 cup  chopped nuts (for topping)
    Optional add ins: raisins, coconut, chocolate chips for topping

To make your muffins:
  1.  Preheat oven to 350. Prepare muffin tins with muffin liners.
  2.  Mix dry ingredients together in a medium bowl, be sure to remove lumps.
  3.  Mix wet ingredients together in a large bowl.
  4.  Add dry ingredients to the wet ingredients.
  5.  Pour batter into muffin tin, about 3/4 cup full for each.
  6.  Bake for 22-24 minutes or until a tester inserted in the middle comes out clean.


You simply MUST try these muffins! They will change your life they are so delicious! They are certain some nutritious muffins :) These also make a great protein filled snack and breakfast topping!

Wednesday, January 26, 2011

Broccoli Turkey Turnip Soup

Broccoli Turkey Turnip soup with grated
raw cheddar cheese and "black dust" black pepper!

Creating the post title for this post really made me laugh. Broccoli turkey turnip soup! It has such a happy go-lucky feeling to it doesn't it? If you are looking for an easy broccoli veggie soup, this recipe is for you. Some would call it "detox New Years soup" (have you noticed those recipes popping up everywhere?) but I would make this soup any time of year, detox or not. Plus, if you eat real food as I do, you don't have to detox!

This recipe was inspired by Elana's recent Broccoli Soup. Her basic recipe sounded fantastic, and as I started to make her recipe, the whole operation kind of went in a different direction and now I have something quite a bit different to share! I added homemade chicken stock, turnips and ground turkey to the recipe. I love the addition of the chicken stock, since the warmth and nourishment of the broth really promote excellent digestion and a happy stomach.

 Another great thing about this recipe is that the soup has no added fat, except the tiny amount of olive oil at the beginning. I did this intentionally to make it light. Fat is necessary for every meal, so depending what you are in the mood for, stir in a glob of coconut oil to boost your coconut oil consumption, stir in a tablespoon of butter, or grate any desired type of cheese on top. Fresh raw cream or coconut milk would also be a great addition to make the soup have an even more creamy consistency. I added the turnips for this reason, creamy whiteness without the cream! The recipe is very basic and easy to customize to your liking. It is also grain-free and low calorie!


Broccoli Turkey Turnip Soup
     serves many, with leftovers for the freezer

1 large heads organic broccoli
1 bag of turnips
water as needed
2 Tbsp olive oil or real butter
1/3 one large vadalia onion
4-6 cups homemade chicken or turkey stock
1-2 lb ground turkey
spices: sea salt, black pepper, nutmeg, garlic powder, kelp flakes

To make your soup:
1. Sautee onions in butter or olive oil until browned, add broccoli and some water and steam until soft.
2. In a separate pot, boil turnips until soft. Strain off water and keep in pot. Add chicken stock and bring to a simmer.
3. In the same broccoli sautee pan, brown ground turkey until cooked through.
4. Pour the broccoli mixture into the turnip pot and puree with a hand blender, or transfer by small batches to a blender. Blend/puree until smooth. Finally, transfer (do not drain) turkey to the pot.
4. Add spices and let simmer for 15 minutes.
5. Serve with lots of black pepper and grated raw cheddar cheese!


This recipe is very versatile since lots of other ingredients and mix-ins can be easily added. I like it just the way it is. I was in an adventurous food-mood one night and to the leftovers I added some frozen crinkle cut carrots and frozen blueberries! Weird combination but it was very good! Maybe I was craving some blueberries :)

It's definitely freezing up here in the North East. This soup will keep you warm at either breakfast, lunch or dinner!

Tuesday, January 18, 2011

Grain-free Apple Crunchy-Crisp


Craving apple crisp during a snow day we had last week, and deciding to remedy my want for warm buttery gooey apples, I whipped up this recipe. It was a real crowd pleaser. Between my parents and I, we ate the whole thing in 2 days. Like 48 hours. It was soo good! I actually enjoyed it for breakfast the next day under some greek yogurt. This recipe is so nourishing you can have it for breakfast. And the ice cream too! Perhaps best of all, it will make your insides nice and warm after coming in from shoveling all that snow!

Delicious topping!

Feel free to use whatever apples you have on hand. I only had grannies, but I really like the combination of grannies, gala and yellow delicious in a warm fruit dessert. Granny smith apples are the typical stand-by, but in my opinion, its the yellow delicious that really steal the show. So if you have more than one kind of apple in the fridge, I highly suggest you use a few different kinds. Either way, this apple crisp is delicious. It is very low in sugar, sweetened by the apples, dates and a bit of maple syrup. This is a dessert is such a nutritional powerhouse that it's kind of crazy to call it a dessert!

Apple Crunchy-Crisp
     serves six with no leftovers

6 small granny smith apples, peeled, cored, cut into slices
2 Tbsp maple syrup
1 Tbsp arrowroot flour/starch
1 Tbsp lemon juice
1 tsp cinnamon
1/2 pumpkin pie spice

4 Tbsp real butter
1/2-3/4 cup unblanched almond flour
1/2 cup sliced almonds
1/4 cup chopped walnuts
10-15 pitted dates, chopped
dash cinnamon
2 Tbsp butter, reserved

To make your crispy cobbler:
1. With an apple apparatus, prepare your apples. Cover with water and lemon juice (prevents oxidation and brown discoloration).
2. Prepare the topping: roughly chop dates, combine with walnuts, cinnamon and almonds. In a separate bowl cut butter into almond flour. Mix flour/butter mixture with other toppings.
3. Drain water from apples. Toss with maple syrup, arrowroot starch and spices. Spread out (do not flatten) in a glass baking dish. Sprinkle topping over the top in an even layer. Slice remaining butter into small squares and distribute evenly over the topping.
4. Cover with tin foil and bake in a 375 degree oven until warm and bubbly, about 30 minutes. Turn up to 400 degrees without the foil and finish for 10 minutes or until topping has browned slightly (watch burning, since this topping has no sugar cane it will not "brown" like other pie toppings).
5. Let cool for a few minutes. It is best served warm with fresh raw cream and homemade french vanilla ice cream or homemade vanilla ice cream.

Finished product :) with ice cream
What a lovely chewy crunchy top!

Currently I am enjoying working at home and having another SNOW DAY! Second week in a row. If you are from the North East... what is your opinion on snow days? Love them, hate them? How do you deal with them?


Saturday, January 15, 2011

Grain-free Spaghetti Squash Casserole


Coming back to NH and the frigid winter temperatures for Winter Break is fun to a point, but it's also freezing! I find myself turning away from salads to warmer dishes. Incorporating protein, vegetables and fats is top priority in each dish, to ensure that it is nourishing and satisfying. Having something warm and easy to make to come home to is wonderful. Driving in the car home after a day at work is freezing! Whipping this up for dinner and sipping some green tea or raw hot cacaolate does the trick for me. I know that this dish will warm your insides too :)


This recipe was inspired by this recipe and this recipe. My version is probably more like the first than the second. It was delicious - thank you ladies for the great idea! This is one of the first dishes in a long time that I couldn't wait to eat the leftovers. The next day I warmed up a piece gently in the toaster oven in a glass baking dish and dinner is served, as delicious and flavorful as the first time!

Melted and gooey mozzarella

Spaghetti Squash Casserole
    serves 6, no leftovers, serves 3 with nice amount of leftovers :) Tastes just like lasagna!!

1 large spaghetti squash
2 Tbsp olive oil
1 tsp dry italian herbs

1 cup whole milk ricotta cheese
2 egg whites
garlic powder - as needed

3 cups leftover spaghetti meat sauce (spaghetti sauce with ground beef)
1/2 one small zucchini, diced
1/4 one large vadalia onion, diced
1/2 cup frozen chopped green beans
2 Tbsp fresh chopped green scallions

1 1/3 cup fresh grated raw parmesan cheese
1 fresh whole milk mozzarella ball, sliced thinly into circles

To make your casserole:
1. To cook spaghetti squash, chop open with a knife into two halves the long way. Place on a sheet pan with a Silpat with the cut side down, or spray with olive oil and place in a glass baking dish. Bake at 350 degrees for about 30 minutes, or until it is easy to pierce through the squash skin.
2. Remove the squash from the oven and while holding in an oven mitt, shred out the squash with a fork. Place it into a olive oil sprayed glass casserole dish and push down, going up a little on the sides like you would a pie.
3. While the squash is cooking, on the stove-top sautee zucchini, both onions, and green beans in half of the herbed olive oil until tender. Add the spaghetti sauce (with meat) and bring to a simmer. Sprinkle garlic powder on top and stir.
4. Mix the ricotta with the other half of the herbed olive oil and egg whites. Spread on top of the bottom layer of spaghetti squash, avoiding the taller sides of the dish. Sprinkle garlic powder on top and add parmesan cheese on top of this.
5. Gently spoon spaghetti-veggie sauce on top of the ricotta layer. Spread evenly. Sprinkle lightly with more parmesan. Place sliced mozzarella on top, sprinkle with salt and pepper, and then finish with the remaining parmesan cheese.
6. Bake in the oven until bubbly and slightly browned on top about half an hour. Remove from oven and let cool/set on counter before serving. Yum!


I had so much fun eating and making this dish. This is going in the "make more often - I love love love this dish - put into normal rotation" recipe pile. My parents agreed. Give it a try and I know you will too!

Enjoy :D and stay warm. I believe my thermometer says 1 degrees Farenheit outside.... Eek!

Friday, January 14, 2011

CSN Stores Giveaway Winner!

It's January 11th everyone, which means you find out who won the giveaway, which was launched 3 weeks ago! Thank you to everyone who participated and commented away.


Here was the deal:

"The giveaway will close 3 weeks from today, which is January 11th. After that time, the winner will be chosen at random. Entries can be submitted up till the evening of January 10th. The winner will be announced on January 11th. And you will have your new culinary "toy" on your doorstep to play with in the first month of the New Year!"

So without further a do (commonly known as stalling :) I shall announce the winner of the giveaway...

The winner is #23, Ashley! Congratulations Ashley! Please contact me with your email and address so we can figure this thing out :) and get your mini-food processor on the way to you!

If I am not contacted within 2 days, I will be contacting another contestant and congratulating them on their win!

-Update-
Cyclic Unemployment is the second winner, #36. Congratulations!! I have contacted you via email. Please contact me back so we can get you your prize!


Thanks again everyone :) I look forward to hosting more giveaways in the future.

Breakfast Bowls.

Bananas, cinnamon, ground walnuts, cacao nibs, warmed frozen blueberries, yogurt of choice.

Food bloggers everywhere seem to be quite particular about breakfast. There's a good reason for this, breakfast is the most important meal of the day. It sets up your metabolism and energy for the whole day. And it also provides important nutrition. Having enough nutrients in the morning will allow you to enjoy your day so much more. I usually never have the same thing each day for breakfast. But it always revolves around protein, fats and minimal carbs. Leftovers from the evening meal before works well too.

Goat milk yogurt, banana, cinnamon, fresh raspberries, ground walnuts, raisins, chia seeds, almond butter.

Left over soup, chunks of banana, cinnamon, greek yogurt.

Mashed avocado and banana, cinnamon, raisins, white chocolate wonderful peanut butter, creamy peanut butter, raw cow's cream.

Fresh blueberries, cinnamon, ground flaxseed, raisins, peanut butter, raw cow's cream.

Plain yogurt, fresh raspberries, whole macadamia nuts, coconut, cacao nibs, chia seeds.

Banana, cinnamon, ground flaxseed, walnuts, sprouted sunflower seeds and pumpkin seeds, sprouted buckwheat, fruit juice sweeteneed raspberry jam.

Banana, cinnamon, ground flaxseed, coconut chips, raisins, raw and roasted almond butter, 2MomsintheRaw grain-free cereal.

Banana, sliced strawberries, cinnamon, ground flaxseed, brazil nuts, leftover cranberry orange muffin.

Avocado chocolate pudding, banana, chia seeds, maple sugar pecans and walnuts, creamy peanut butter.

Plain yogurt, baked plantains, raisins, cinnamon, cacao nibs, homemade cashew butter, roasted almond butter.

The spotted blue bowl was custom made just for me by my college friend Lydia, who was an art major.  I used that bowl nearly everyday when I was in undergrad.  Now I like to use it to hold garlic in the pantry ;) Bowls just have so many uses!

Hopefully these bowls will be helpful for some ideas for you :)

Wednesday, January 12, 2011

Chocolate Chunk Bark


It's easy to walk into the kitchen and plan on doing a recipe, from start to finish. I do this often. It's a whole 'nother story when you walk into the kitchen, plan on doing a recipe, and end up making something different because one component of the recipe goes awray.


Last weekend, my brother was over for dinner. He requested I make him a snack to take home (I love to make people things, and was delighted!) which is basically pomogranate seeds mixed with dark chocolate. It comes out in clumps and he calls it "Moose Poop." To funny! When I was melting the chocolate to make the recipe, it seized. Most likely because I added some butter to it, the chocolate was too warm, and the type of chocolate I was melting wasn't appropriate for the situation. I find that Enjoy Life chocolate chips, while delicious, do NOT work in any sort of chocolate melting application. When properly heating chocolate slowly over a double boiler, adding butter should not make it seize.


Jumping into action, my Mom grabbed a pan, some nuts and other mix-ins, into which I stirred the almost-completely-seized-ruined chocolate. We spread it out on the bottom of the pan and threw it in the freezer to set. It turned out a complete success! My remedy for seized chocolate? Make BARK. I've done this twice now, and am always pleased with the results.

So use a good chocolate when melting, and if you accidentally seize your chocolate, make it into this delicious bark!


Chocolate Chunk Bark
    makes a full 9x13

2 cups chocolate of choice (chips or bars is fine)
3 Tbsp real butter
1/2 cup sliced almonds
1/2 cup sunflower seeds
1/2 cup cacao nibs
1/2 cup pistachios
1/2 cup raisins
flaked coconut - for topping

To make the bark:
1. Melt chocolate gently over a double boiler. Remove from heat when almost totally melted and add 3 tablespoons of butter. Mix with a spatula until melted.
2. Mix nuts and nibs in a separate bowl. Pour in the chocolate. Toss until everything is well coated with chocolate.
3. Spoon into a 9x13 pan and smooth with a spatula. Sprinkle flaked coconut on top, press down with back of a spatula, your hands or plastic wrap.
4. Freeze until set. Let warm in kitchen for 10 minutes before slicing. Refridgerate or freeze the squares. Put way back into the freezer so you don't eat too many! (This really works :)

This bark makes a great dessert or snack. It's also a great "granola bar" replacement, which are full of processed sugars and grains. While there is some sugar in the chocolate, the fat in the chocolate, cacao nibs and nuts balance out it's affect on your blood sugar, so there are no big spikes. The kids will love it's flavorful crunchy texture! Since it is a super easy recipe, get your kids involved. They can have fun measuring out the nuts- feel free to use your nuts and seeds of choice! Kids will also love licking the bowl of chocolate. But of course, adults can do that too :)

Enjoy your new gluten-, soy- and grain-free snack option! Happy snacking!!

Saturday, January 8, 2011

Grain-free Waffles.

Waffles have always been something I enjoy.  Although since going gluten-free (and now paleo/primal), I never had another waffle again... That is until this Christmas, nearly 3 years later!  My wonderful Aunt gave me a great waffle maker for Christmas.  I had been eye-ing some grain-free waffle goodness for a while now, and I was delighted to finally be able to make some.

I topped mine with a happy pastured fried egg!

My first try came from Cara's recipe, here.  The recipe was good, but not quite right for my waffle maker.  My waffle maker is huge! My second try, using this recipe, was much better.  And then with a few edits, I came up with this.  Next time I will double the recipe and have more left overs.  Coconut flour is very dense and filling, so I can usually eat 1/4 of one large Belgian waffle, including various toppings, and be perfectly satisfied.  The remaining waffles I slice in halves and fourths and freeze for later.  They also make a great sandwich bread option.  Who needs gluten-free bread when you can have gluten-free waffle sandwiches?

Grain-free Waffles.
    adapted from this recipe
    makes 3 large waffles in my waffler, approx. 1 cup (a bit over) batter each

    4 Tbsp melted coconut oil
    6 real eggs, from happy pastured chickens
    1/3 cup + 1 heaping Tbsp coconut flour, more as needed
    1/2 tsp sea salt
    1/2 tsp baking powder
    1 tsp vanilla, optional
    1-2 tsp cinnamon, optional
    water

To make your waffles:
  1.  Turn on your waffle maker to medium heat. Spray it with olive oil - we don't want stickies!
  2.  Crack eggs and beat until glossy yellow.
  3.  Mix dry ingredients together. Mix eggs and coconut oil and whisk this into the bowl with the dry mixture. (Or you can be lazy like me and put it all into one big bowl and whisk together). It's better for egg incorporation to do it separately, and I think the "lazy" way might have actually taken longer! Add water to thin to right consistency, not too runny and not too thick.
  4.  Pour batter into your waffle maker, mine took over a whole cup of batter to fill. Depending on your maker you will get more or less waffles, and require less or more batter, or require more or less heat.
  5.  When done, gently remove to a hot sheet pan in a 200 degree oven to keep warm as the other waffles are being made.

I topped my waffle with a fried egg for protein, warm blueberries, fresh goat yogurt, strawberries, walnuts, bananas, chocolate chips and of course, grassfed butter.  There was also some grade B maple syrup on the side for dipping if desired.  The pictures didn't turn out as good as I hoped, so I will save you from them :)  My whole family really enjoyed these, and they were requested again and again on other mornings! 

Photo credit: Healthhomehappy.com

Enjoy your nourishing grain-free waffles, as well as your waffle sandwiches for lunch!  This is the best photo I've found of a waffle-sandwich so far.  Have fun waffling ;)

Raw Milk Eggnog, no HFCS!

That title says it all. What could be better in a drink than full fat, rich raw milk from grassfed cows, raw honey to lightly sweeten and no preservatives or artificial colorings or flavors?


Nourishing Raw Milk Eggnog

    2 cups raw cream, from grass-fed cowies
    2 cups raw whole milk, also from grass-fed cowies
    8 real eggs, from pastured chickens and a farmer you trust
    1/4 - 1/2 cup raw honey - I used a full half cup
    1 full vanilla bean, open and scrape out seeds
    ~1/4 tsp nutmeg - fresh is best, but we had none and ran out of the regular ground nutmeg!

To make your eggnog:
    1.   Combine cream, milk, honey, eggs, vanilla bean seeds and nutmeg in a blender.
    2.   Blend until smooth and frothy.
    3.   Chill immediate or pour into glasses and enjoy. Make sure you shake the jar before pouring some more into your glass! The spices tend to settle.

Some people use only the egg yolks, but I accidentally used the whole egg! I really don't think it matters this time, but next time I will remember to only use the yolks since raw egg whites have enzyme inhibitors so raw egg white shouldn't be consumed raw, whereas egg yolks can.

It's really that easy! This recipe is so nourishing you can eat it all year round, breakfast lunch and dinner, for a snack, dessert or treat, or even after a hard workout at the gym! The eggs and milk provide lots of nourishing fats and proteins, which balance out the sugars from the raw honey. No sugar rush from this eggnog. Only real food goodness. Drink up! Good-bye store-bought eggnog.

Merry Christmas!

Christmas Morning: Grain-free Waffles and Fresh Eggnog

Grain-free coconut flour waffles,
pastured fried egg on top.

This Christmas was all about "breaking" tradition and making new ones. My brother G is engaged to a wonderful girl who lives "close-by" so this Christmas it was important to accomodate both families, and also do what was best for them. A happy engaged couple does not want to spend one minute apart, as I am sure some of you have experienced :) We ended up celebrating Christmas with the two of them on the day after Christmas, the twenty-sixth, instead of actual Christmas day. At first, the thought of this really bothered me. But as soon as the day came, I was more than happy to wait. We were very happy to wait and see them and be together as a family. That is the most important part of Christmas day to me. My family means the world to me. The next we had church, since it was a Sunday, what a better way to kick off celebrating Christ's coming and birthday than by going to church that morning? The rest of the day we had fun eating pot-roast, gluten-free Yule Log, opening presents and joking around and sharing stories.

On Christmas morning, my brother and I usually wake up, go down stairs with our presents we bought for our parents to place them under the tree. "Santa" usually comes in the middle of the night. When my parents get up, we have a "grab breakfast" where we eat a little, and open a few presents, and repeat. It's a really relaxing way to do Christmas. When my mom was not so educated in nutrition in my younger years, I would remember she would always make warm blueberry muffins for us. We always had egg nog, but it was the store bought stuff which is full of oxidized cholesterol, HFCS and preservatives. I used to love the stuff growing up, but I haven't touched it since learning about WAPF and real food. This year I was determined to make some real stuff. Thanks to these recipes from Wardeh and AnnMarie, I made the most delicious eggnog I have ever tasted. My brother, who is sold on the stuff from the store, even enjoyed it! That means it passed the "test." This eggnog is so nourishing, full of protein from raw milk and pastured eggs, lightly sweetened with raw honey, a sweetener that actually has benefits!

You can find the recipe for my raw milk eggnog here.

Real delicious EGGNOG, in process!
Farm fresh pastured eggs from happy chickens.
Foamy, nourishing and delicious vanilla
bean-flecked  raw cream/milk eggnog.

Before the eggnog making commenced, however, my parents and I were hungry. We slept in and eventually wandered into the kitchen to make some breakfast. I was lovingly given a new waffle maker from my Aunt on Christmas Eve. The adults in my family do a Secret Santa system, and she had me. Luckily she is a good cook, so she knows what to buy! She gave me the VillaWare UNO Pro Belgian waffle maker, it's so cool because it's one that you turn! Super fun. I was anxious to try it out, so we whipped up some waffles and did! I really enjoyed using it. It was actually my first waffle in about 3 years. I hadn't had any since going gluten-free; we never got around to replacing our old "glutened" waffle maker which my parents received as a wedding present. Miraculously it still works. Mom is going to take it to a second home next week!!

See here for my delicious grain-free waffle recipe.

I trust that you all had a great Christmas. I would like to officially say

HAPPY NEW YEAR! 

I must admit I hate saying that, but everyone does, and it would be impolite of me to not ;) right?
Did you do anything different with your family this Christmas?