Showing posts with label bananas. Show all posts

Monday, December 22, 2014

Single Serving Protein Pancake.

FLUFFY

Hey everyone :) I know it's been a while, but this blog is no longer a tip top priority! Med school has me busy busy, along with all the typical life stuff that has to happen. Talk about a balancing act!

Today I bring you a recipe for a single serving pancake. I've been eyeing pancake recipes lately, especially the "single lady" ones, but I was never quite happy with the ingredients that were used, so I chose my own.

Banana slices hiding on the bottom, with greek yogurt and cooked strawberries and raspberries.

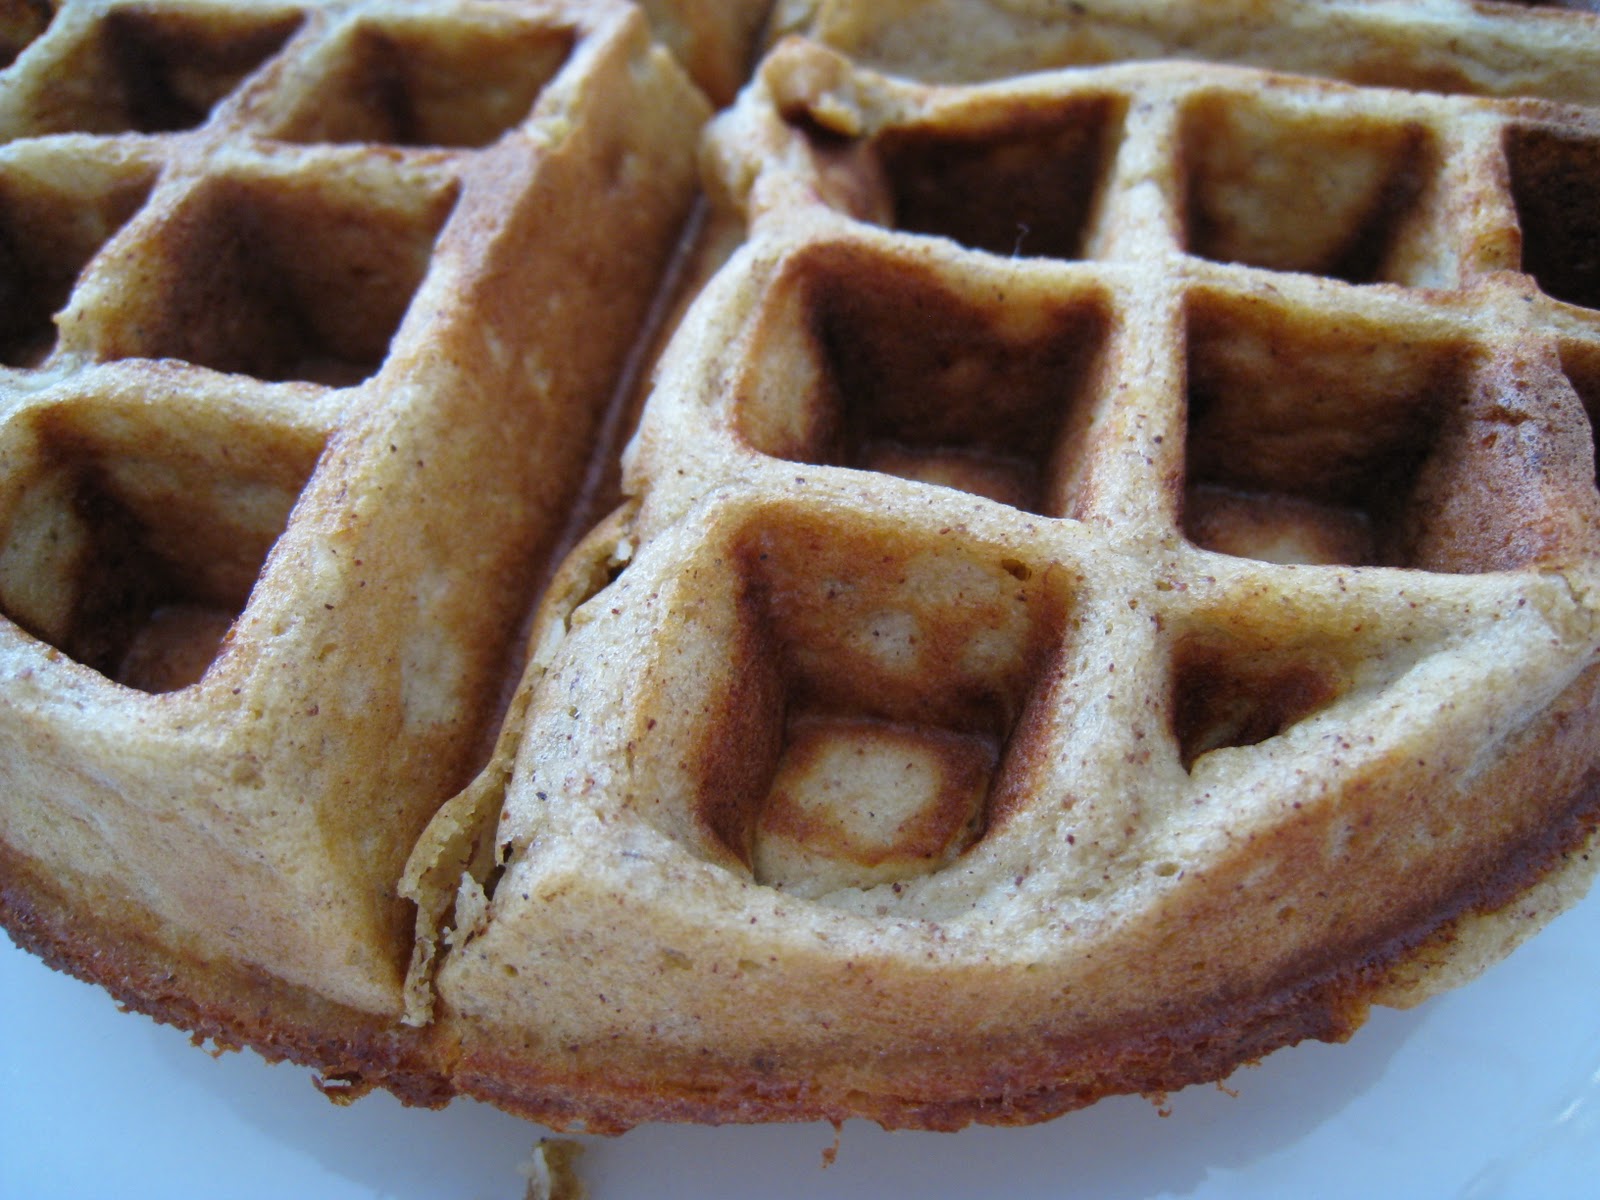
This pancake is everything I could ever want in a pancake :) It's fluffy, has a nice nutty flavor from the flaxseed, it's full of protein, and isn't too sweet, so it's easy to top it with things like a touch of maple syrup, butter or some yummy berries and yogurt.

The secret to success in this recipe is measuring the ingredients, and also using a non-stick pan. I know that non-stick pans are not at all the best choice health-wise, but there's really no alternative when you want to make some awesome pancakes.


Single Serving Protein Pancake.
    serves one or two

    15 grams / one serving of brown rice protein powder - I use Nutribiotic plain, you could use brown rice flour here also
    50 grams / ~1/2 one normal sized banana, mashed
    8 grams / 1 heaping Tbsp  ground brown flaxseed
    3 grams / 1 scant Tbsp  ground chia seed
    12 grams / ~1 tsp  runny honey
    2 eggs / about 100 grams  give or take depending on your egg size
    1 gram  baking soda (this is a very small amount)
    15 drops  vanilla extract (I used a dropper)
    pinch each: salt, ground cardamom

To make your pancake:
  1)  Combine all ingredients into a bowl and whisk well, scraping off the sides with a spatula and getting everything incorporated. The only lumps present should be a little bit of mashed banana. The batter will appear thin, and shiny from the eggs, resist adding more dry ingredients.
  2)  Preheat your nonstick pan on medium-low heat (#4 on my stove, point at small hand on the 7 in 7 o'clock).
  3)  Pour batter onto the pan. Do two batches, or pour it all in for one pancake (this is what I do).  Cook on one side for about 5 minutes. Pancake is ready when there are some bubbles on top and you can see the edges are beginning to set. Work your rubber spatual around the edges of the pancake and also the bottom. One pancake requires one massive or two normal sized spatulas to flip it.
  4)  Flip pancake and wait another 1-2 minutes.
  5)  Remove pancake to a plate with banana slices already on it. Place pancake on top of sliced bananas. Drizzle with maple syrup or whatever is desired. I like to put some butter on top, berries and homemade yogurt. ENJOY!

My first attempt; not quite right but topped with yum!


Because someone will want the stats ;) Thanks to myfitnesspal.com

I hope you are staying both warm and well this holiday season :) Love to all my readers :)
Merry Christmas!


PS - And no, this recipe will not work if you substitute the egg for something else.

Sunday, June 29, 2014

Grain-free Unsweetened Paleo Banana Bread.


I've been wanting to share this recipe with y'all for too long. Banana bread is one of my all-time favorite things (which is no secret, see below for more banana-centric recipes), and for a long-time I've been elusively searching for and experimenting with the perfect-for-me banana bread recipe. Two years ago I created my delicious grain-free unsweetened primal pumpkin bread, and I love that recipe so much that I believed it had to be possible to morph it into a banana bread instead. After a few different tries, what I'm sharing with you now is a paleo banana bread recipe I am most proud of :)


Grain-free Unsweetened Paleo Banana Bread.
    makes one standard loaf

    1 cup  blanched almond flour
    1/2 cup  organic coconut flour
    3 happy eggs - mine were large
    1/2 cup  coconut oil - mine was soft
    1 1/2 cups  mashed ripe bananas (about 2 large)
    1 tsp  baking soda
    1/2 tsp  unrefined sea salt
    1 Tbsp  raw apple cider vinegar
    1 tsp  ground nutmeg
    1 Tbsp  cinnamon
    2 tsp  vanilla
    20 drops  clear stevia

To make your banana bread:
1) Preheat oven to 375 degrees.
2) Pour all ingredients into a high speed blender (Vitamix!)
3) Blend briefly until incorporated.
4) Pour into a glass, standard loaf pan, that has been greased with coconut oil, and floured with coconut or almond flour.
5) Bake for about 20 minutes, check on the bread and maybe rotate the pan, and bake for another 20-30 minutes depending on your oven. Let bread cool in the pan, then carefully turn out and slice. Store it in the fridge, or the freezer! But most likely your family will gobble it up in no time!


And now, I invite you to explore my other banana lovin' recipes!

Banana Bread Muffins

Grain-free Zucchini Bread

Banownies

Banana Macadamia Nut Muffins

Almond Butter Banana Blueberry Muffins

Grain-free Post-surgery Banana Bread

Grain-free Almond Banana Waffles

Grain-free Unsweetened Banana Cake

My Original Banana Cake

Fruity Vegan Oatmeal Bake


Enjoy your banana bread. It's great spread with some almond or peanut butter or slathered with some juice-sweetened black raspberry jam :) YUM. Or even butter, if you're so inclined.

And I know the pictures aren't super great. It's been really hard to adjust to all the poor Seattle lighting!


Wednesday, December 25, 2013

Almond Butter Banana Blueberry Muffins.


My mother introduced me to the idea of making muffins with almond butter after she had made some yummy muffins from one of our favorite bloggers, Megan, The Detoxinista. My sister in law is currently on a special diet and she was able to have these muffins; and she loved them! Both ladies spoke so highly of them that I knew I wanted to try making them myself. So the night before our family Christmas Eve celebration, I whipped some of these up, while making a few of my own changes ;)

I really like this recipe because it's so flavorful and so easy! It takes about 5 minutes to whip up, and about 20-25 minutes to bake, so within the hour you can have warm, cooled, ready to eat muffins for your friends and family! I highly suggest you wait for these muffins to cool. When they first come out of the oven the bottoms will feel a little "soggy" but they firm up as they cool. The texture of these muffins is fabulous!


Almond Butter Banana Blueberry Muffins.
     makes one dozen muffins
     inspired by this recipe

    1 cup  almond butter (mine was raw, but you can also use roasted, store-bought, or made at home)
    1/2 cup  mashed ripe banana (mine took 1 whole banana)
    1/4 cup (or even 2 Tbsp)  maple syrup (or runny honey)
    2  happy eggs
    1/2 tsp  baking soda
    1/4 tsp  unrefined sea salt
    1 Tbsp  cinnamon
    1 cup  frozen blueberries

To make your muffins:
  1)  Preheat your oven to 350 degrees, convection; line a muffin tin with paper liners.
  2)  In a large bowl, combine almond butter, banana, maple syrup, and eggs. Mix well. Add soda, salt, cinnamon, and mix again. Lastly, fold in the frozen blueberries. Do not overmix.
  3)  Using a 1/4 cup measuring scoop, transfer batter to muffin tin. Bake at 350 for 20-25 minutes, depending on your oven, and remove muffins when tops are slightly springy to the touch. Cool for 10 minutes in the pan, then transfer to a wire rack to cool more. Store in the fridge to keep for longer, or outside the fridge if eaten in 2-3 days.


These will freeze well also, and are a great "make ahead" option. They are also very portable, and will no doubt please a crowd. Kids and adults alike loved these muffins when I brought them to our Christmas Eve gathering. You can feel good about giving these muffins to your loved ones, as they are low in sugar, and high in fat and protein, which makes for a great snack, or side dish to eggs for breakfast.

Enjoy! I know I will be making these way more often from now on.


Wednesday, September 4, 2013

Banana Macadamia Muffins.

 
For the past two weeks I've been on a muffin craze, which has me seriously thinking why I don't make muffins more often. Perhaps the one thing between me and muffin-land is the belief that muffins take longer from start to finish. Well, after making 4 different batches of muffins in the past 2 weeks, I can definitely say, I am so totally wrong! Muffins are easy. Easy easy easy. Which means... More muffins! More muffins! Yay!

You will certainly feel my enthusiasm once you taste these muffins. I orginally found the recipe on Tropical Traditions coconut recipe website (which is great for inspiration), but have never made a recipe from there before. I never make a recipe from someone I don't know, or a blogger I don't respect. I've done it before, and they don't work out. Anyways! So these muffins looked so great, and after looking at the ingredient list I figured they couldn't go wrong, so I whipped up these muffins. I am so glad I did! They are moist, with just the right texture and not overloaded on any one ingredient. My favorite thing is that you can make these in one bowl quite easily, then pop them into the oven and you've got some delicious muffins to share!

I made some minor changes to the recipe, like subbing coconut water vinegar for lemon juice, since it's what I had on hand, and I didn't toast the coconut before adding it to the batter, since that would just be another step. I've also found that the recipe makes 14 muffins, so you'll need more than one muffin tin. Head over to thepaleomom.com for the original recipe!


Banana Macadamia Muffins.
    makes 14 muffins

    2/3 cup  macadamia nuts of choice, chopped
    2/3 cup  unsweetened coconut flakes
    1 cup  blanched almond flour
    ¼ cup  organic coconut flour - source
    3  ripe bananas, peeled and mashed
    2  eggs, room temperature
    1/3 cup  raw creamy honey
    1/3 cup  organic coconut oil, melted and cooled
    ¾ tsp  baking soda
    ½ tsp  unrefined sea salt
    1 tsp  coconut water vinegar or apple cider vinegar or lemon juice
    1 tsp  vanilla extract

To make your muffins:
  1. Preheat your oven to 350 degrees convection. Take out 2 muffin tins and place muffin liners inside.
  2. In a large bowl, add nuts, coconut, flours, baking soda, salt; mix to combine.
  3. To the same bowl, add eggs, bananas, honey, coconut oil, vinegar, vanilla; mix again to combine.
  4. Drop by tablespoons into the muffin tins. Fill 14 muffins full. *This will make 14 full sized muffins as long as there is no batter eaten in the process.
  5. Bake for about 30-35 minutes, rotating the pans at 20 minutes for best results. Let cool in pan for 5-10 minutes. Then move muffins to a cooling rack, which helps to firm up their bottoms. Enjoy!


These muffins can be frozen or refridgerated! I recommend storing them in the fridge, versus the countertop before eating. Be sure to share these with your family and friends, they're quite tasty!


Sunday, August 25, 2013

Banana Bread Muffins.


Banana bread is one of my favorite things in this whole wide world. After being inspired by some banana macadamia nut muffins I made, I knew that I could make some banana bread muffins that were absolutely delicious! So that's what I did. They're also grain-free and gluten-free (and wicked tasty)!

These little muffins taste just like banana bread, but are more portable! They're also super easy to whip up too, which will be great for when I start classes again.


Banana Bread Muffins.
    makes 14 muffins

    2/3 cup  walnuts, chopped
    2/3 cup  unsweetened coconut flakes
    1 cup + 2 Tbsp  blanched almond flour
    ¼ cup  organic coconut flour - source
    3  ripe bananas, peeled and mashed
    2  eggs, room temperature
    1/4 cup  raw creamy honey
    1/3 cup  organic coconut oil, melted and cooled
    ¾ tsp  baking soda
    ½ tsp  unrefined sea salt
    1 tsp  coconut water vinegar or apple cider vinegar or lemon juice
    1½ tsp  vanilla extract
    1½ tsp  cinnamon
    ½ tsp  freshly ground nutmeg
    toppings - optional

To make your banana bread muffins:
  1. Preheat your oven to 350 degrees convection. Take out 2 muffin tins and place muffin liners inside.
  2. In a large bowl, add nuts, coconut, flours, baking soda, salt; mix to combine.
  3. To the same bowl, add eggs, bananas, honey, coconut oil, vinegar, vanilla; mix again to combine.
  4. Drop by tablespoons into the muffin tins. Fill 14 muffins full. *This will make 14 full sized muffins as long as there is no batter eaten in the process.
  5. Bake for about 30-35 minutes, rotating the pans at 20 minutes for best results. Let cool in pan for 5-10 minutes. Then move muffins to a cooling rack, which helps to firm up their bottoms. Enjoy!


I am such a fan of banana bread, I know I will be making these often! And they are sure to please a crowd, so try bringing them to parties and sharing with friends and family!!

Saturday, September 1, 2012

Grain-free Unsweetened Banana Cake.


Today is my birthday, so I thought sharing a cake today would be only appropriate.  I didn't make this cake today, however, but made it sometime early summer.

Banana bread has always been one of my favorites.  Since going gluten-free, I've made lots of different versions.  Up until now, my best recipe has been my original banana cake recipe.  Then there was a banana cake made with oatmeal.  There was also my gluten-free whole-grain banana bread, which I adapted from my favorite wheat-based recipe when I first went gluten-free.  And now there is this banana cake.  Made with grain-free flours, left-over soured milk, and bananas, this banana bread is easy to digest, primal and absolutely delicious!  I also love it because it give me a use for raw milk that has gone a little bit too sour to be palatable.  Raw dairy is so valuable nutritionally, it's such a waste to not use it!


I've made this recipe twice now, and it's been fantastic.  The first time I made a frosting over the whole cake made with peanut butter, butter, yogurt and coconut oils.  It was fantastic and I ended up eating it for breakfast because it had enough protein and fat to make my metabolism happy :)  The pictures you see here have one layer of a peanut butter-butter frosting in the middle, but not over the entire cake.  I hope to tweak my peanut butter recipe, get it just right, and then share it with you.  For now, feel free to mix equal parts, butter, fresh ground peanut butter, a few drops of Stevia clear, and vanilla extract together to make a wonderfully nourishing peanut butter filling for the middle of these cakes.  And be sure to share with family!  It's so good (and makes a lot) so sharing should be mandatory!  This cake is also completely unsweetened (bananas only) and it's Primal!


Grain-free Unsweetened Banana Cake.
    makes two 9" rounds

    1 cup  blanched almond flour - source
    1 cup  organic coconut flour - source
    3 cups  ripe bananas, mashed
    6 small  real eggs
    2 cups  soured raw milk
    1 Tbsp  warm spice blend (mine was a mix of cinnamon, cloves, ginger, cardamom, nutmeg, allspice)
    1 Tbsp  vanilla
    1 tsp  baking soda
    1/2 tsp  unrefined sea salt
    2 Tbsp  grassfed butter (to grease the pan) - source


To make your banana cake:
  1.  Preheat the oven to 375 degrees (convection or non-convection, same results for this cake). Use your fingers to butter the cake pans liberally.
  2.  In a large bowl, mash bananas, whisk in eggs, sour milk, and vanilla.
  3.  In another medium sized bowl, combine flours, baking soda, and sea salt.
  4.  Mix wet ingredients into dry, using a spatula to incorporate.
  5.  Distribute batter evenly between both pans. Bake for about 35-40 minutes or until sides have pulled away from the pan and top is golden brown. When the cakes have cooled, remove from pans by gently inverting them onto your hand or a plate.  Wait until cakes are completely cooled to frost, if desired.

Texture up close.

This cake has quickly become one of my favorites, I hope you enjoy it too!

Friday, March 9, 2012

Grain-free Waffle Sandwiches

Turkey bologna, sharp cheddar, green leaf lettuce, mustard and homemade mayo @ mid-munch ;)

Last week I posted about my new favorite grain-free almond banana waffles.  They are really different than my original grain-free waffles, since they are not as dense and taste super great plain.

Sandwich close up

One of my most favorite things to do with leftover waffles is make grain-free waffle sandwiches!  I don't eat any gluten-free bread and so this has been a great option for me when I really want a sandwich, which happens occasionally but not very often.

Top view

The combinations are endless.  My pictures here show organic turkey bologna with real sharp cheddar cheese, dijon mustard, homemade mayo and fresh green lettuce.


Best of all, you can make GAPS safe sandwiches with these waffles!  What a great departure from squash and soups, yes?  To learn more about the GAPS diet and it's healing abilities for myriads of symptoms including poor digestion, click here.  For even more resources, here.

pb + j

Or you can make the classic peanut butter and jelly, or almond butter and jelly!  This picture shows peanut butter and fruit juice sweetened locally made strawberry rhubarb jam.  (Which is a FANTASTIC combo by the way, if you've never tried it :)

No pb + j is complete without a little bit of oozing ;)


Waffles shouldn't be limited to savory sandwiches and can easily be incorporated into a dessert dish for something sweet.  This is a waffle sliced in half topped with organic pink lady apple slices and organic chocolate sauce.  What a treat!


Don't let the pretty pictures fool you, they really are easy to make! 

Grain-free Waffle Sandwiches

    Directions: 
      Simply take a waffle quarter (I have a Belgian waffle iron that creates a round waffle divided into   four pieces), gently cut it in half, and fill with the ingredients of your choosing.  

More ideas:
         Freshly sliced cheeses, meats like bacon, roast beef slices, roasted chicken and turkey, as well as homemade meatballs add protein. 
         Veggies like cucumbers, tomatoes, and lettuce add some filling crunch.  
         Spread the insides with goat cheese, grass-fed butter, homemade mayonnaise, real guacamole, or nut butter and jam of choice. 
         Avocado slices and fried eggs would be a yummy option as well. 

Feel free to create the sandwich of your dreams!

Thursday, March 1, 2012

Grain-free Almond Banana Waffles.


I have a new version of grain-free waffles to share!!  Those of you who have read my site for a while will remember my first grain-free waffles.  They taste really great, but these new waffles taste even better in my opinion.  (How is that possible?!)  One of the reasons I like this recipe so much is because they taste great plain, which is atypical of many grain-free versions!!  I also like how this grain-free waffle does not rely on coconut flour or eggs.  I love my other grain-free waffles, but they more dense compared to regular waffles and coconut flour is very filling.  They are, however, GAPS friendly.  Overall, this recipe has a bit more natural sweetness (from the banana) and isn't so dense.  The texture is FAB!  This recipe is also good for those who either don't care for coconut flour or just want a real food waffle recipe that doesn't use so many eggs!

I created this recipe on a whim one morning as I was whipping up some of my original grain-free waffles.  I wanted a recipe that did not use coconut flour.  And I wanted it to be easy!  So these waffles were born :) And I can tell you that they're here to stay

Grain-free Almond Banana Waffles.
    makes about 2 large Belgian waffles

    3 real eggs
    1 cup  blanched almond flour - source
    1/2 cup  organic shredded coconut - source
    2 Tbsp  almond butter - source
    4 Tbsp  butter, softened or melted - source
    1 ripe banana, mashed
    1 tsp  cinnamon - source
    1 tsp  vanilla - source

To make your waffles:
  1.  Turn on your waffle maker to medium heat. Spray it with olive oil - you don't want it to stick!
  2.  In a small bowl, crack eggs and beat with a whisk by hand until glossy yellow.
  3.  In a medium bowl, mix dry ingredients together. Make sure your coconut is finely shredded, and not in the form of flakes or chips.
  4.  Mix eggs and melted butter (but make sure butter is not boiling hot!) together, and whisk this into the bowl with the dry mixture.  **Add water to thin to right consistency, not too runny and not too thick (this step is optional, do if needed).
  4.  Pour batter into your waffle maker. Mine took over a whole cup of batter to fill and make one waffle. Depending on your waffle maker, your waffle yeild may vary, requiring less or more batter, or requiring more or less heat.
  5.  When done (mine beeps!), gently remove to a hot sheet pan in a 200 degree oven to keep warm as the other waffles are made.  Try using two forks or a fork and spatula for this step!
  6.  Enjoy your waffles!  Top them with BUTTER, yogurt, real maple syrup, peanut butter or fresh fruit.  And they're so good you can even eat them plain!!


I must admit, one of the best parts about these waffles is how great they are later, whether they're cold and left out for a few hours after making, or after they are frozen (for weeks) and then are thawed out.  And PS, they make great waffle sandwiches.  More on that in the next post!!

Happy waffling ;)
And Happy March!

Monday, August 1, 2011

Grain-free Zucchini Bread


Every once and a while I find a recipe that just tastes SO good! A recipe that you just can not stop eating. It happened especially with my original banana cake, nourishing protein barschocolate chunk bark, the best cornbread, gluten-free gingerbread men, and now it's happening again. I'll admit, while this phenomenon of finding an excellent recipe is preferable, it is a problem. Recipes that are just too good are a problem simply because it's extremely tempting to eat the final product in one sitting. Eating a whole batch of baked goods in one sitting (while it may be delicious) is not recommended for good digestion or my girl-ish figure. May this be your warning that this grain-free zucchini bread is quite good :)

Great texture!

Summer means zucchini, zucchini means zucchini bread, and zucchini bread means happy stomach. But only if you're baking with real fresh eggs, health fats and simple ingredients. This bread has all of that! For lack of a better word (augh here it comes) this bread is moist, sweet, and nutritious. Anyone else not like using the word "moist"? Bananas, eggs, and zucchini make the bread moist/soft/creamy; the banana, coconut sugar and maple syrup make the bread sweet (I am going to cut back next time); and the zucchini, eggs, and cinnamon make this bread super nutritious.


Grain-free Zucchini Bread
     Makes one standard loaf 

     4  real eggs
     38 g  coconut sugar (palm sugar)
     4.1 oz  maple syrup (I use grade B)  
     70 g  organic coconut oil - softened
      2 g  cinnamon
      4 g  vanilla
      2 g  sea salt
     88 g  organic coconut flour
     81 g  natural almond flour (unblanched - I use Honeyville)
     35 g  arrowroot flour
     4 g  baking powder
     50 g  organic coconut flakes
     176 g  ripe banana (2 medium)
     12.2 oz  organic farmer's market zucchini - shredded (weighed after draining)
     80 g  organic raisins
     chopped walnuts for topping

To make your zucchini bread:
  1.  Preheat oven to 350 degrees convection.
  2.  In your food processor, grate zucchini. Turn zucchini into a tea towel and squeeze out the natural water of the zucchini. Let sit while preparing other ingredients, and squeeze hard once more before adding to bowl.
  3.  Place first three ingredients in a small bowl and whisk vigorously together by hand one minute.
  4.  To that bowl, add next four ingredients and whisk until combined. Small lumps are ok.
  5.  To the same bowl, add next six ingredients and mash together.
  6.   Finally, fold in zucchini and raisins. Pour batter into a greased (with old butter wrappers or coconut oil) standard loaf pan. Top with ground walnuts if desired.
  7.   Bake in oven until bread rises, cracks slightly on top, walnuts are browned, sides have pulled away from pan and a stick inserted in the middle comes out clean; about an hour.


These measurements are given in grams or ounces, and I do not know the cup or metric conversions. I have found that baking with a food scale, not only is easier, but takes much less time. After my experience baking and in food service, it's hard for me to use measuring utensils, as I am used to "scaling out" every ingredient.

Yummy walnut topping!

Also, as I mentioned earlier, this bread is very sweet. I included my original measurements in this recipe, but next time I know I will use less coconut sugar and maple syrup. I enjoy the sweetness, but it makes this bread just too good and a bit too sweet for my taste. Enjoy this grain-free version of zucchini bread :) I sure did!

Sunday, June 26, 2011

Chocolate Date Bars


As promised in my last post, here is the triangle mystery bar. These are Chocolate Date Bars! I used a triangle scone pan to get their interesting shape, but I think they are actually better suited to be scooped with a cookie scoop and rolled into tiny bite-sized balls!


Chocolate Date Bars

    1 small (6-7") baked plantain
    2 T cocoa powder
    1 T maple butter
    3/4 cup walnuts
    4 medjool dates - pitted
    1/4 cup organic coconut flakes
    1/2 tsp sea salt
    cacoa nibs - as topping

To make your bars:
1.  Place dates, walnuts, coconut flakes in food processor and process until it is a course mixture.
2.  Add cocoa powder, maple butter, sea salt and the baked plantain and process until the mixture comes together and is cohesive.
3.  Pat down into desired type of pan (I used a scone pan!) or scoop out little balls of the "dough" of the processor onto a cookie sheet.
4. Press cacao nibs onto the top or roll balls in cocoa nibs.
5. Freeze until set. Eat and enjoy!

I would highly suggest keeping these in the freezer or the refrigerator before consuming, their texture is rather soft and tends to get even more soft if left out at room temperature.

Yumm, cacoa nibs :D

Since I know that I will probably get asked this, can you substitute a banana for the plantain? The answer is yes and no. Both types of "fruit" are related, but bananas are considerably LESS starchy and are more wet in consistency than a plantain. If you plan to use bananas either dehydrate the final product for a few hours, or you can add some coconut flour to the mix to help hold everything together.


P.S. - These taste like brownies! :D