About

Thursday, July 29, 2010

Gluten Free Gingerbread Men


I can't believe that I am sharing this with you right now. I have perfected the gluten free ginger bread man. After a lot of hard work and experimentation I have finally got it! It all started out from this recipe, and quickly morphed into something of my own.

Those of you who are gluten free know what I am talking about. Finding a gluten free cookie that is easy to roll out with a manageable not sticky not dry dough is nearly impossible! The gluten that's missing usually creates the ease of workability that other wheat doughs have. Without gluten as a binder, gluten free rolled out cookies become something more than a mere challenge, they're downright difficult!

I was not going to let that stop me. And now, I have a wonderful cookie recipe for you. I am so proud of it I can hardly stand it. The gingerbread men flew off of the shelves at
the bakery. I'm so glad to be offering the customers a gluten free version of the favorite classic gingerbread men!!


Gluten Free Gingerbread Men

1 cup brown rice flour
1/2 cup tapioca flour
1/2 cup cornstarch
1/4 cup sweet rice flour
1/2 tsp xantham gum
1/2 tsp sea salt
1/2 tsp baking soda
2 tsp ground ginger
1 tsp cinnamon

57 grams organic palm oil shortening (time to get a food scale!)
1/4 cup white sugar
1/2 cup molasses


To make gluten free gingerbread men:
1. Combine flours, spices and leaveners in a small bowl.
2. In a separate bowl, cream sugar with shortening until light and fluffy. Add molasses and beat again.
3. Beat dry ingredients into wet ingredients until a dough begins to form.
4. Pull dough from the beaters, form into a ball, wrap in plastic wrap and refridgerate for at least two hours, or until cold. You can also use the freezer for a shorter period of time.
5. After the dough has chilled, take it from the fridge and roll it out on some plastic wrap that has been sprinkled with GF flour. Cut out with the cookie cutter and gently lift the cookie onto a Silpat or parchment paper lined cookie sheet. It is best to work the dough in smaller batches.
6. Bake in a 325 degree convection oven for about 10 minutes. Remove cookies from the oven when they have risen, slightly browned on the bottom and are firm to the touch.
7. Enjoy! Spread icing on the tops, this is purely optional.

You know what I just realized? These are vegan! Gluten free and vegan! That was completely unintentional! In fact, it should satisfy a good amount of people. I am quite proud of this recipe, especially since the dough is SO easy to work with. Please please enjoy and tell me what you think!


I'm off to go whip some of these up for the bakery (after my morning work at the bakery, of course)! They are so fun to make :) 


What's your favorite cookie??

Tuesday, July 27, 2010

Plans

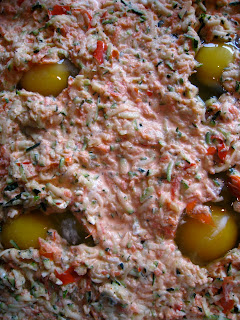
Look at this mess!
One day this past week I set out to make a roasted vegetable dish featuring the left over egg whites I had in my fridge. Something similar to a fritatta, but not started on the stove. A few minutes into the preparation process as the dish was evolving I found out that my original plan was not going to happen, and the dish starting going in a WHOLE new direction.


This seems to happen to me quite often! Most of the times good dishes result, and I find that if I follow my intuition, or go with my "gut" everything usually turns out ok. It's the times when I ignore the voice that says "I know you want to add another cup, but it should really only be a tablespoon" the dish goes awry.  I love to experiment in the kitchen, so winging it is always a source of enjoyment for me.

Here's the dish I threw together! It was really fun to make. Thank you MOM for doing the dishes!!

Zucchini Red Pepper Spice Casserole

4 eggs
8 egg whites - unbeaten
2 medium vadalia onions - shredded in the food processor
2 large zucchini - halved, seeded and shredded in the food processor
2 red peppers - shredded in the food processor
1/2 cup herbed sour cream (mine was Wallaby organic sour cream (delicious) and a local homemade herb spice packet)
1 tsp salt
hint of: smoked paprika, garlic powder, nutmeg, cayenne

To make the casserole:
1. Prepare veggies in the food processor. Shredding onions first, place in a dish towel and wring out the liquid. Spread the shreds on the bottom of a sprayed glass baking dish.
2. Shred the zucchini, transfer to another dish towel and wring out the liquid. Place the shred of one zucchini on top of the onions, and the other place in a bowl.
3. Shred red peppers and add to the zucchini bowl.
4. Scoop out your sour cream on top of the red peppers and zucchini; add spices and mix together.
5. Pour egg whites over the onion and zucchini layer. Make four little places in each corner and crack eggs into each one- do not break the yolk. 
6. Spoon the creamy red pepper and zucchini mixture around the eggs.


Right before the oven!
Do you like to wing it in the kitchen? What dishes do you usually throw together without a plan, (or a changed plan?? :)


Sunday, July 25, 2010

Basil Buddies!

Meet my basil plants!

The one on the left is named Burton, he's from Whole foods.


He's been with me for a few weeks now and is doing fairly well.

And this is Churchill (on the right), the new addition! He's from a nice lady from the craft fair in town. He's much bigger than Burton, but they still get along fine. They are having no problems sharing the sunny window sill so far.

Their basil leaves helped me to make my delicious grain free gluten free crackers. They are also having a splendid time doing photosynthesis in my kitchen.

I decided to buy some herb plants this summer, why not!? They are pretty and practical. I don't know about you, but I always get a little frustrated when a recipe has about 10 different herbs and spices. Yes, I understand how critical each one is in the balance of flavor, but it doesn't make it easy! Having a few herb plants around will enable me to knock off a few recipes on my list that I keep putting off because I never have fresh herbs. I hate buying fresh herbs too at the store because they come in packets that are either too big to use at once, or they are cut and not "fresh" looking at all. At Whole Foods a few weeks ago I also bough

I am planning on making some basic basil pesto with my plants leaves. I have never made any pesto before, and I want to make the most classic recipe before branching out. I've had pine nuts in my pantry patiently waiting for over a year now (has it been that long?!) This weekend my mom and I are planning a shopping trip (and shopping is conveniently located to our closest Whole Foods, which is over an hour away!) so I will be able to purchase some good parmesan cheese. Presto Pesto!

The weather today is not soo good. Where is the sun for my lovely planties!?

Saturday, July 17, 2010

New pages, take two!

I've done some more blogging updates.. look for some new content soon :) It has been yucky weather here (hott, humid, overcast) so I haven't gotten to take some good pictures with natural light. And I hate posting bad photos!

Friday, July 16, 2010

Banownies, revisited!


Remember Banownies 1.0. ??


Last summer I created several fantastic brownie recipes.  Brownies seem to be one thing that I keep coming back to.  I love making brownies, they are the perfect combination of chocolate and "bready" type dessert (or snack!)  While I love cookies, I find that brownies are more satisfying. And nothing beats a warm brownie and real vanilla ice cream.

There is going to be a party at my house tonight.  My mom wanted me to put my culinary skills and time (she works ALL day, I'm off on Fridays) to good use.  So Wednesday when I was baking for Yum Yums, I also found the time to whip up some of these banownies.  With all this humid, sunny and hott NH heat, the bananas at camp have been ripening way faster than usual, and that means a lot of brown bananas waiting to be made into something delicious.


I made the recipe the exact same way, so technically this cannot be a "revisited" post since I am not editing the recipe at all.  It was a good affirmation for me, though, that the recipe is not a one hit wonder, since the banownies came out fine this second time.


Banownies. (when bananas and brownies get married)
    makes one 9x13 pan 

    1 1/2 cups  good quality cocoa powder
    2 tsp  baking powder
    1/2 tsp  baking soda
    2T  vanilla extract
    6  small ripe bananas- mashed
    6 eggs  - use less if they are jumbo, mine were fairly small
    8 oz (1 cup)  unsalted butter, 70% melted
    2 cups  UNPACKED brown sugar
    2 cups  white sugar
    2 cups  chocolate chips
    2 cups  chopped raw or roasted walnuts
    coconut flakes for topping

To make your "banownies":
  1.   Combine in one giant bowl.
  2.   Mix-e-vous.
  3.   Pour into a olive oil sprayed/butter greased 9x13 pan.
  4.   Place in a preheated 350 degree oven. Bake until the coconut has browned, the sides have set, and the middle has a little bit of jiggle.
  5.   Serve to some VERY lucky people. Whipped cream anyone?

Before!
After!

Once you take these out of the oven, DO NOT cut into them immediately (seriously), the brownies need time to set.  These are also very ooey and gooey so keep them in the fridge if its humid, or they can last on the counter for probably a max of three days, since it's summer.  But before you cut them, place them in the fridge or the freezer for a few hours, if you want real squares and not blobs!


Maybe these should be called molten brownies instead! :)


New Pages

I have had this blog now for a few years and have often thought about privacy. I have withheld a lot of information, pictures and so on to be on the safe side. My blog was not taking on the vision that I really wanted it to, and I am realizing that to acheive my goals I need to be a little bit more personal. As a blog reader myself, I find that it is often the little personal touches that a blogger adds to their space that makes their blog and their content that much better to read. So I've decided to do it too, and am happily done! Now you have a face to this blog, and it's all in my 'About Me' page. I feel that the amount of information I am sharing is small compared to other blogs. Some people blog about seemingly every aspect of their life. You won't find me doing this.

Also, there is a wonderful iHerb giveaway at Kelly's blog. GO check it out!!


Tuesday, July 13, 2010

Day Two

Day two...... with the new design! I loved your comments about how to fix the picture. I made several improved versions again in Photoshop and tried uploading them all and they all looked basically the same. It's obviously a Blogger problem, since the image looks way better on my screen before I upload it. But I guess I'm the only one seeing it so other people (like you mentioned) cannot tell there's anything wrong.

Monday, July 12, 2010

New Look!

Mutritious Nuffins now has a NEW look! I am so excited. I am still working on a lot of stylizing and layout settings, so bear with me as new things come and go. After a day or so of researching Wordpress and creating a blog there anticipating moving over, I found WP was way too complicated for my taste and have decided to stay with Blogger. Mnuffins greatly needed an update though!

Currently the header picture is new, but it doesn't look as good as how I made it on the computer?! It seems not as vivid (washed out) and not as sharp. Any ideas?

Saturday, July 10, 2010

Grain-free Organic Basil Crackers


My mom is the cracker fiend. She loves crunchy things. She loves bready things. Not a very good combination for someone who is gluten free! I also love the idea of crackers, but sometimes I prefer not to eat any grains. Last summer I came up with a delicious cracker recipe and I've been making them for my mom ever since. These past few days I've been inspired (and urged by my mom) to make some more crackers, and I knew that I wanted to have a new and even easier cracker option. Today I bought another basil plant, and so I made some crackers.

I adapted Elana's easy rosemary cracker recipe. These crackers really are delicious! They are a perfect snack option when paired with some beautiful raw milk cheese, cold crispy cucumbers, homemade nutella or dipped in some goat cheese. Because they are made with almond flour, they are also relatively high in protein, which I love.

Basil Crackers
adapted from Elana's Pantry

1 cup blanched almond flour
3/4 cup unblanched almond flour (Or you can use 1 3/4 cup unblanched or blanched - does not really matter)
2 Tbsp freshly chopped basil
1 Tbsp Tuscan olive oil (olive oil infused with herbed spices)
1/2 tsp: celtic sea salt, garlic powder, onion powder
1 real egg

To make your crackers:
1. In a medium sized bowl, combine almond flour, spices, olive oil and egg. Fold together with a spatula until combined into a paste.
2. On a 13x17 baking sheet, move your cracker "dough" to the sheet, cover with plastic wrap, and roll to desired cracker-like thickness. Peel away the plastic wrap. I used a silicon baking sheet cover, so if you do not have one of these be sure to grease the pan or use parchment paper.
3. When the "dough" is all rolled out, take a pizza roller to cut the unbaked dough into squares. Make lines longitudinally and then across. You can add little fork holes for decoration, but that is optional. 
4. Bake in a 325 degree convection oven for 10-15 minutes or until crackers come together and are golden brown. Enjoy! Keep in the fridge for longer than 3 days or risk annoying mold!

I thought that the recipe didn't make much cracker, but it did fill up my cracker jar nicely. We will just have to see how fast they disappear! I ate some crackers tonight with my stir fried veggies, dipping them in the sauce; they hold up really well.

I gave them to my mom and dad to taste test and my mom loved them. My dad, who has the blandest taste buds ever (he can't handle any different taste or spicy food) declared that they were "strong." My mom and I died laughing!