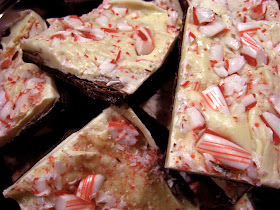

For Christmas this year, I made my brother G some peppermint bark. I got the idea after I received a curious email in my inbox from him with a link to a peppermint bark recipe online. I had planned on making him some sort of Christmas treat and giving it to him under the tree, but I ran out of time before Christmas day, so I ended up making it a few days later. After seeing his idea, I could not help but make his exact request!
Peppermint bark
adapted from Rita Heikenfeld
12 oz semi-sweet chocolate chips (use good quality chocolate, Ghirardelli or better)
11 oz white chocolate chips (same as above)
1/2 tsp peppermint extract (not the fake colored kind)
6 or 7 white + red peppermint candy canes, crushed
To make the peppermint bark:
1. Line a 9x13 pan with tin foil, pressing it down and into the corners.
2. In a double boiler, melt chocolate chips.
3. When all but a few chips are melted, remove chocolate from heat and stir, melting the final chocolates.
4. Pour into the bottom of the pan and smooth with a spatula.
5. Place pan into the refridgerator to cool.
6. In a double boiler, melt white chocolate chips.
7. A good 5 minutes before the white chocolate is done, remove the first chocolate layer from the fridge and allow to sit on the counter.*
8. While waiting for the white chocolate to melt, unwrap candy canes and place into a plastic baggy. Beat with a heavy ladle or mallet until they are crushed to bits but not a powder.
8. When all but a few chips are melted, remove white chocolate from heat and stir, melting the final chocolates. Be gentle with the chocolate. Since white chocolate isn't real chocolate (many brands have no cocoa butter content) it is very finicky.
9. Stir in peppermint extract.
10. Pour white chocolate on top of the first chocolate layer and spread carefully with a spatula.
11. Immediately sprinkle peppermint bits on top of the white chocolate layer and press in with your fingers.
12. Return pan to the fridge to set. In about a hour take out chocolate and allow to sit out for about 20 minutes. Now the chocolate is ready to cut. Lift out the chocolate by grasping the foil. Place on a cutting board and cut evenly with a knife into desired size.
13. Place your pretty bark into baggies or Christmas tins and distribute to friend and family, or hoard it all to eat yourself.
*Failing to do this prevents the white chocolate layer from adhering to the first chocolate layer; when you cut into it the white chocolate layer will separate from the chocolate layer. Instead you want both layers to stick together so you have one batch of bark with both layers intact. Trust me, don't skip this step.
He deemed it so delicious that I chose to make it for gifts for friends and family. It is very important the exact process be followed for success. Enjoy your bark!

Meagan! Courtney told me that you had a fabulous blogging thing going on so I thought I would check it out. It is so fun to read. You are such a gifted baker and I LOVE your sense of humor through it all : ) AND I also wanted to say THANK YOU for this delicious bark. Peppermint is my favorite bark and this was THE BEST I have ever had! Keep creating!
ReplyDeleteLeslie A